Terracotta Floor Tiles Overview

Terracotta Floor Tiles Overview

There are many different types of flooring options you can choose for your home.

One option that is growing in popularity, and one that offers a unique look, is terracotta floor tiles.

Before choosing terracotta or any type of tile, it’s important to understand the benefits and disadvantages of each type. By reading this article on terracotta tiles, you will be able to make an informed decision about whether or not they are right for your space. Let’s get started.

Image Credit: http://originalstyle.com

What are terracotta floor tiles?

Terracotta floor tiles are very similar to the clay pots or other types of pottery you might see in a kitchen or at a flower shop. However, these tiles are designed specifically for use as home flooring and can be purchased at your local hardware store. They come in various shapes, sizes, and color options. They are most often glazed to give them a nice finish and enhance the decorative aspect of their look.

How do they differ from ceramic and porcelain tiles?

While terracotta floor tiles come in many different shapes, sizes, and colors, they also vary slightly based on what type of material is used to make them. Specifically, terracotta tiles are made of clay, while ceramic tiles are made of a mixture of clays and other materials.

Porcelain tiles are made from a type of clay that is fired at a very high temperature, making them much harder than both terracotta and ceramic tiles. This makes them more resistant to wear and tear, as well as to water damage.

Ceramic tiles are the most common type of tile that is used in homes. They are affordable, durable and come in a wide variety of colors and styles. Porcelain tiles are more expensive than ceramic tiles, and they offer a much higher level of durability. If you are looking for a long-lasting tile that will not require a lot of maintenance, then porcelain may be the right option for you.

What is the difference between glazed and unglazed terracotta tile?

As mentioned earlier, terracotta floor tiles come in both glazed and unglazed varieties. Glazed tiles are treated with a layer of glass that is applied to the surface of the tile. This layer helps to protect the tile from wear and tear, as well as water damage. It also makes them easier to clean, which can be very beneficial in high-traffic areas of the home where they are likely to get dirty quickly. Glazed tiles are more expensive than unglazed tiles, but you will find that most hardware or home improvement stores offer free installation on glazed terracotta flooring purchases over a certain amount. If you are looking for an affordable option with a great look, then consider installing unglazed terracotta tiles in your living room or another area of the house that gets light traffic.

Where can you buy terracotta floor tiles?

You can purchase terracotta floor tiles at many different retail shops and online retailers. They are typically sold in bulk, so you will need to calculate the square footage of your space before heading out to make your purchase.

Why should you choose terracotta floor tiles over other types of tile?

There are a few reasons why you might consider purchasing and installing terracotta flooring in your home. Let’s have a look at the most important ones.

High durability

When installed correctly, terracotta tiles can last for decades without showing signs of wear and tear. The glaze on these tiles helps them resist water damage, so they will not be easily damaged by spills or leaks from appliances such as washing machines or dishwashers. This is especially important if there is an auxiliary bathroom located near the kitchen, where many accidents occur that could damage standard ceramic tile flooring. These tiles are also resistant to scratches, making them a great option for high-traffic areas of the home.

Wide variety of colors and shapes

Terracotta tiles come in a wide variety of colors and styles, so you are sure to find one that will complement the look of your home. You can also find tiles in various shapes and sizes, which gives you some flexibility when it comes to designing your flooring. If you are looking for a unique tile that will stand out, then consider using terracotta flooring in your home.

ffordable

Terracotta flooring is typically much more affordable than other types of flooring materials such as marble or granite. This makes a popular choice for budget-conscious homeowners who are looking to make a big impact on the look of their homes.

Easy installation and care

Terracotta floor tiles can be installed by almost anyone with basic DIY skills, and they require very little maintenance. You will find that these tiles resist most stains and spills, so you need not worry about removing them to clean up messes. Combined with their affordability, this makes them great options for do-it-yourself homeowners who want to add value to their homes without spending a lot of money or time on renovations.

They come in different shapes and sizes

Most terracotta tiles come in one of three shapes: rectangular, square, or hexagonal. The size varies depending on the style of the tile. Some are very small, at only two inches by two inches in size, while others are much larger at four inches by eight inches or more.

It is easy to find one that complements the room

Terracotta tiles come in a wide range of different colors and styles, so it can be difficult to choose just one for your flooring project. The best way to narrow down the options is to decide what style you want for your home renovation project. Old-world traditional homes typically look great with terracotta flooring because this type of design evokes feelings of nostalgia and romance. On the other hand, modern or contemporary decor styles typically need a darker or less colorful tile to maintain their sleek appearance.

They resist water damage

One of the biggest benefits of installing terracotta floor tiles in your home is that they are resistant to water damage. This is because they have a glaze on them that helps to repel liquids and keep them from penetrating the surface of the tile. If you live in an area where there is a high risk of flooding, then terracotta flooring may be the best option for you.

It can also be a great choice for homeowners who live near lakes or rivers because it resists the damage caused by moisture.

They are aesthetically pleasing

Terracotta tiles come in a variety of different colors, including reds, greens, oranges, and yellows. If you select one with a color that complements your home’s overall decor theme then you will achieve an aesthetically pleasing appearance when the flooring is complete.

You can install them indoors or outdoors on patios and walkways if desired. They are generally very affordable to purchase and they have widespread availability at most home improvement stores.

Wholesale Terracotta Tiles Supplier & Manufacturer, China Hanse Terracotta Tiles For Sale at Low Prices

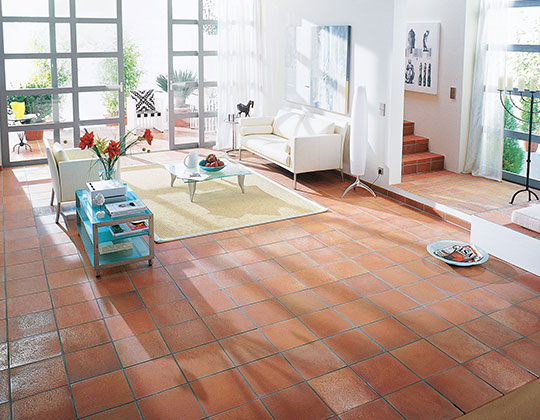
Image Credit: http://hanseceramictile.com

Terracotta Floor Tiles Overview – FAQ

What are terracotta tiles?

Terra cotta is the term to describe unglazed ceramic products made from earthenware, stoneware, or porcelain clays. The name comes from Italian for “cooked earth”.

How durable are terracotta tiles?

As with any flooring, material durability will vary depending on wear and traffic patterns. It is important to consider the finish type as well as installation techniques when making your selection.

Most critics agree that glazed tile is more difficult to maintain than unglazed tile because no matter how careful you are, eventually the dirt penetrates through the glaze and may not come out.

Final thoughts on terracotta floor tiles overview

In conclusion, there are several factors to take into account when planning your new terracotta floor Understanding what’s involved when choosing terracotta floor tiles will help you work out what best fits your circumstances.

The post Terracotta Floor Tiles Overview appeared first on Kitchen Infinity.

Did you miss our previous article…
https://www.thelavkitchen.com/?p=737

Creative Bathroom Organizing Ideas

Creative Bathroom Organizing Ideas

Bathrooms can be a total mess. It seems like you never have enough storage space, and every time you need something in there, it’s always at the bottom of a pile somewhere. Most bathrooms are small spaces that make organizing hard, if not impossible.

On top of that, we all have our personal preferences for keeping things clean and tidy. Luckily we have lots of easy ways to organize your bathroom with little to no cost involved. We’ve rounded up some bathroom storage ideas below so you can get started on making yours look neater immediately.

dd a Shelving Unit Above the Toilet

There are lots of ways to store toiletries above the toilet. You can put up a cabinet, use a wall-mounted shelf, or get creative with what you have around your bathroom. Many companies also sell shelving units made to fit around standard-size toilets.


Image credit: https://cdn.decoist.com/

Another great option is to build open shelving above the toilet for additional storage. Doing it on your own provides more opportunities to match the shelving with your home decor style. Also, consider open shelving.

These open vanities are classic and can make any sink look like a modern floating style and they don’t take up too much visual space in small bathrooms. You can easily add floating shelves underneath for attractive storage baskets that can even disguise the plumbing.

Lean a Ladder for Towel Storage

The space between the bottom of your shower and the ceiling is a great place for storing towels if you have an old ladder lying around. This is one of the straightforward ways to hang towels in your bathroom, especially when you add hooks or a towel bar to the wall.

Lean a Ladder for Towel Storage
Image credit: https://i5.walmartimages.com/

Incorporating ladders into your modern bathroom for hanging towels lets you maximize that vertical storage. Plus, you can hang hooks and baskets from a ladder to store washcloths and other toiletries.

Mount Shower Caddy Using Suction Cups

Hanging a shower caddy from the ceiling is an easy way to free up space in your bathroom. All you have to do is screw a hook into your ceiling, then fix strong suction cups or adhesive hooks to the shower surround. This frees up both counter and floor space while also giving you easy access to your bath products, linens, candles, and other toiletries when you’re in the shower.

Mount Shower Caddy Using Suction Cups
Image credit: https://m.media-amazon.com/

A wall-mounted bath caddy allows you to store more items without taking up any extra storage. A bath caddy is one of the easiest and inexpensive small storage bathroom ideas to implement.

Store Your Reading Material

One of the best ways to free up counter space is to store your reading material elsewhere when it comes to bathroom organization. A great place to put it is in a magazine rack or bookcase that’s mounted next to the toilet. This way, you can grab your reading material when you’re finished with your business, and you won’t have to clutter up the countertop.

Store Items on the Inside of a Cabinet Door

If your bathroom doesn’t have a great deal of counter space, every inch is valuable. However, there are several items you can store on the inside of cabinet doors to free up room. For example, place an over-the-door shoe rack on the back of your bathroom door or in another inconspicuous area so you can store extra towels or shampoo bottles.

You can also buy a tension rod and hang it on the back of your cabinet door to store washcloths. You can also take advantage of this space by attaching clear bins to the doors in which you can store everyday essentials. Label each bin and add dates to items that have an expiration. This way, you’ll know where everything is, and nothing will go to waste.

Create Some Space for a Hair Dryer

If you don’t have a lot of space in your bathroom, try to find an alternate spot for your hairdryer. You can hang it on the back of your bathroom door or a hook on the wall. This way, you’ll have more room to store other items.

To implement this bathroom organizing idea, you can use an over-the-door rack to fit wider items, including hair tools. The nest part is that you won’t need to drill holes to hang it.

Keep Stylish Items on a Tray

If you want to keep your bathroom looking stylish, try placing all of your luxury items on a tray. Everyday household items, such as hand lotion, perfume, jewelry, cotton swabs, makeup brushes, and tissues can be placed in canisters or jars so they don’t take up room on the counter. Decorate your bathroom countertop with a stylish tray to hold some of your most-loved and visually appealing items.

Use Lazy Susan in Your Bathroom Cabinet

A Lazy Susan is a round turntable that can be installed into your bathroom cabinet. You can use this to store all kinds of items, including makeup, hair appliances, and personal hygiene products. Simply spin the lazy Susan to find what you need.

Use Cups or Jars for Storage

Add three mason jars to your medicine cabinet to make quick work of organizing toothbrushes, cotton balls, and swabs. You can even use cups or votive candle holders for storage on the countertop to hold your makeup brushes or favorite perfumes.

By storing items vertically inside a jar or cup, you can make better use of the vertical space inside the cabinet. This bathroom organizing idea requires you to keep items together. These include one jar for cotton balls, one jar for cotton swabs, and another for other necessities.

Create a Skinny Alcove

Use a skinny alcove in your bathroom to store smaller items like lip balm, sunscreen, or hand sanitizer. You can also fit larger items into the space by turning them to their sides. By using the vertical space within the alcove, you can stack extra towels and hold baskets with all your skincare products without sacrificing surface area in your bathroom.

Designate a Place for Dirty and Clean Towels

You can keep your bathroom neat and organized by designating a place for dirty towels. After you’re done in the shower, hang the towel on a hook right next to the shower or tub. If possible, create a small spot for a hamper so clothes and wet towels don’t end up in a pile on the floor. You can roll some clean towels and store them on top of the hamper to save space.

Roll Up a Bar Cart

If you have an unused bar cart sitting around, grab it and roll it into your bathroom. You can fit the cart perfectly in the corner, so you will free up some counter space if there’s no room next to your sink. You can also use this area as a makeshift vanity area since there are many drawers for all of your beauty. This is also a good place for flowers to freshen up a guest bathroom or powder room.

Blend It in with Colors and Patterns

If you’re aiming for a more sophisticated and chic style, match your bathroom organizer with the colors and patterns on your shower curtain. For example, if your shower curtain is white with colorful flowers, an all-white or cream laundry hamper will fit right in.

Paint it the same color as your wall for a clean, cohesive look if you’re looking to keep your bathroom storage shelving from standing out as a focal point. This also allows the entire space to feel sleek, clean, and fresh. Check how to paint the bathroom to get some amazing ideas.

Create Storage Unit Under the Sink

If you’re short on storage space, consider creating a hidden storage unit under the sink area. This is a great place to store bins for toiletries, cleaning supplies, and towels. You can even buy a special cabinet or organizer specifically for this purpose. While a decorative shelf is mounted on the wall for decorative items, the under-sink area offers you room to stow items out of sight, even if you have a tiny bathroom.

Fake a Linen Closet

Don’t panic if you’ve got a space that doesn’t have room for an actual linen closet or the previous owner took the closet when they purchased your home. Instead of having no place to hang damp towels and hand towels, give this idea a try. Take advantage of the free corner wall and add a shelving unit there. You can also attach baskets to the wall for a spot to fold extra towels and washcloths. A slim wall unit will also work.

Organize Bath Toys in Waterproof Bins

Do your kids have bath toys that they never seem to put back when it’s bath time? Turn a cheap plastic organizer into something functional. Niches in the wall are a great spot for storing such toys in a small plastic bin. If you don’t have a niche, turn to a strong suction cup near the bath. You can also hang an extra shower curtain tension rod along the back wall of the tub and add hooks so that you can hang toy bins.

Divide Vanity Drawers into Sections

Don’t let your bathroom vanity drawers look like junk drawers. Instead, purchase drawer dividers and group items together to make your drawers functional and appealing storage spaces. Curate your new vanity drawers with commonly used products that make sense in your household.

FAQs on Creative Bathroom Organizing Ideas

What are the three types of bathrooms?

Bathrooms are categorized as the master bathrooms, containing a shower and a bathtub adjoining the largest bedroom. There is also a full bathroom or full bath, containing four plumbing fixtures, including a toilet and a sink, and a half bathroom or powder room, containing just a toilet and sink.

Final Thought on Creative Bathroom Organizing Ideas

As you can see, bathroom organization isn’t as simple as throwing everything into a cabinet and closing the door. You have to plan out where things will go and what you want to bring together in one place.

Try these bathroom organizing ideas to spice up your space. Don’t let the lack of storage or time be an excuse for not washing your hands after using the restroom! Take some time out of your day to organize, and you will thank yourself later.

The post Creative Bathroom Organizing Ideas appeared first on Kitchen Infinity.

Did you miss our previous article…
https://www.thelavkitchen.com/?p=730

How to Troubleshoot Your Clothes Dryer

How to Troubleshoot Your Clothes Dryer

Your clothes dryer is a very important appliance in your home. It helps you save money by drying the laundry at home instead of going to the Laundromat. However, there are times when it breaks down and stops working properly.

Since most people don’t know how to fix their broken clothes dryers, they will buy a new one or take their laundry elsewhere for drying. You don’t have to do that as fixing the clothes dryer is as easy as how to do laundry itself. Below is how to troubleshoot your clothes dryer without calling the repairman or buying a new one. Let’s get started.

Tools and Materials

Voltage meterLong-handled bristle brushRigid dryer ventNew dryer fuseNew dryer power cordCotton swabRubbing alcoholNew dryer belt

Instructions

1. Check if the Dryer is Plugged In

Dryer problems happen because of power interruptions. Before you do any troubleshooting, make sure your dryer is plugged in. Check the voltage meter if there is electricity running through it.

If not, check the circuit breaker or fuse that provides energy to your dryer. Make sure that all electrical connections are tight and secure to avoid loose wiring. If you have an electric dryer, it runs on two circuits, including one for heating the element and one for the rest of the dryer.

So, if your dryer is getting hot but not drying, it could be that one of the two circuits is tripped. In this case, check the circuit breaker and reset the circuit as necessary. Also, learn how to install a dryer electric cord to avoid any electrical issues.

2. Make Sure Your Dryer is Not Overloaded

If you’re trying to dry a lot of clothes at once, your dryer might be too overloaded to function properly. In this case, try drying fewer items or use a larger dryer. Overloading the dryer can cause drying performance and noise issues when too much weight is inside the dryer.

When you squeeze too many clothes into your dryer, you decrease the airflow needed to dry clothes properly. Overloading also makes your dryer work harder, use more energy and increase drying time. Avoid filling your dryer drum more than three-quarters full.

3. Check the Breaker or Fuse

If your dryer is plugged in but won’t turn on, the power source is the first thing you want to check. It’s possible that the breaker has been tripped or the fuse needs to be replaced. Check the Breaker Box If you have an electric dryer, turn off the circuit with a tripped breaker switch and reset.

If you have a blown thermal fuse, replace it with the same amperage and rating. Also, check the voltage in the outlet using a voltage meter and make sure your outlet is functioning properly. If it’s not functioning, call the electrician immediately.

If you have a gas dryer, make sure the pilot light is lit and that you have an adequate supply of gas if the dryer is fueled with liquid propane. Both electric and gas dryers require 240 volts to operate. And if the dryer power cords fail, check the voltage and replace it if needed.

4. Inspect the Fuse, Switch, and Belt

If you have a power outage or surge in your home, it’s possible that the thermal fuse in the dryer control panel is damaged. Dryers also require a door switch to engage for the appliance to work. However, these switches can break.


Image credit: https://upgradedhome.com/

You can get them coated with lint or use a cotton swab and a bit of rubbing alcohol to clean the contact areas. Check the rubber belt that connects the motor to the drum if your dryer heats up, but the drum doesn’t turn. If it’s loose or broken, replace it. It’s a good idea to inspect the fuse, switch, and belt before a service call.

The fuse is located on the dryer wall and is usually a small, round glass tube. If it’s blown, replace it with one of the same amperage and rating. The switch is located near the dryer door and is either a toggle or rocker switch. If it’s not working, replace it.

The belt is located around the dryer’s drum, and if it’s broken, worn, or loose, it will need to be replaced. After getting the new belt, place it on the drum where the old belt had been and wind it onto the idler pulley and the motor pulley.

5. Check and Clean the Temperature Sensor

If the sensor is dirty, it will not read the correct temperature, and your clothes will not dry properly. To clean it, unplug the dryer and remove the screws that hold the sensor in place. Clean it with a soft brush and replace it.

Check and Clean the Temperature Sensor
Image credit: https://fleetappliance.com/

Test the dryer to see if it’s working properly. If your dryer turns on and shuts off very quickly, the problem could be either the thermostat or thermal resistor. The thermal fuse blows and turns off the dryer to prevent overheating.

Use a voltage meter to check the temperature sensor to determine if it’s working properly. Also, check the heating element and timer to be sure they’re receiving power. Check the user or repair manual.

6. Clean the Lint Trap

Clean the lint trap after every load of laundry to ensure your dryer is running properly and efficiently. A clogged lint trap can cause your clothes to take too long to dry. Hard lint buildup in the trap can cause your clothes to dry slowly, if not at all.

Clean the Lint Trap
Image credit: https://images2.minutemediacdn.com/

If your lint filter is full, the air is not flowing freely, and your machine is forced to work longer than necessary. After emptying your lint filter, wash with warm soapy water and let dry completely to remove any residue from the dryer sheets. Use a bit of rubbing alcohol to clean the electronic moisture sensors. This will leave your dryer working more efficiently and prevent a possible fire.

7. Check the Air Vent and Ducts

The air vent and exhaust duct play a key role in the drying process. Make sure they are clear of any debris or obstructions. If you have pets, their hair can clog up the vents and ducts, resulting in a clothes dryer that does not work properly.

If your dryer vent system is kinked, clogged, or disconnected, use a long-handled bristle brush to clean out the dryer vent. The vent should be as short as possible between the machine and the outside exhaust vent to prevent clogs. If your venting system is long and you can’t reach the entire length with a brush, use a leaf blower to clean the system or hire a professional.

If you still have a flexible white plastic dryer hose, replace it because this is a fire trap waiting for a disaster. And that’s why new building codes require a rigid dryer vent. Make sure you check the outside vent as well.

Most of them are designed with a trap door that only opens when dryer air and lint are blown out. The trap door won’t open if the vent hood gets coated with lint, especially in high humid climates.

8. Make Sure the Dryer is in a Ventilated Space

Your dryer needs to be in a well-ventilated space so the hot air can escape. If the dryer is too close to a wall, the air won’t circulate, and your clothes will take longer to dry. In fact, if the back of the dryer is against a solid surface, it can cause the motor to overheat.

If you’re installing your dryer in a closet, make closet doors have ventilation openings at the top and the bottom of the door. The front of your clothes dryer requires a minimum of three inches of airspace, one inch on the sides.

9. Check for the Heat Problem

If your clothes take too long to dry, first check the heat problem. The most common reason for clothes not drying is that the dryer isn’t getting hot enough. Hold your hand under the outside exhaust hood to check air movement. If the air movement is less than a hair dryer at high speed, clean the lint from the entire length of the system and exhaust hood.

The dryer isn’t heating if you can’t feel any air coming out. One way to test if the dryer is getting hot is to use a thermometer. Put the thermometer in the exhaust pipe and ensure it reads at least 130 degrees Fahrenheit. If it’s not reading that high, you need to troubleshoot your heat problem.

10. Check the Dryer Blower Wheel

Another common reason for the lack of heat is a blocked dryer blower wheel. This can happen if the lint screen isn’t cleaned often enough. To check if the blower wheel is blocked, open the dryer’s back panel and look at the blower wheel.

If it’s dirty, clean it with a vacuum cleaner. With the back panel open, check the blower wheel for cracks or obstructions that may be preventing it from spinning. To remove the blower wheel, open up the dryer by separating the top and front panels away from the main dryer cabinet. Pull the drum off the drum bearing to have full access to the motor and then unscrew the blower wheel from the motor.

11. Replace the Control Panel

If the dryer isn’t getting any power, you’ll need to replace the control panel. Before doing this, unplug the dryer and remove the back cover. During this step, you will find your thermal fuse, and its location will be dependent on where it is in your particular model of appliance. Read your owner’s manual for information about control panel components to order the correct replacement.

Replace the Control Panel
Image credit: https://i.ytimg.com/

FAQs on Troubleshooting Your Clothes Dryer

What is the common problem with dryers?

Excessive noise is the most common problem with dryers. A new drum belt can help eliminate some of the noise during operation, but there could be other problems if it doesn’t work.

How do I know my dryer isn’t working?

If you have no power, your dryer isn’t working. Begin troubleshooting by unplugging it and checking the power at your electrical outlet to be sure.

Does my dryer need an electrical reset?

If your dryer is making some noise but isn’t tumbling, you can check to see if the drum needs to be reset by pulling the lint out of the back of the machine where you would normally clean it. There’s a small red button on the motor that you can push with a paperclip or something similar to reset it.

Final Thought on How to Troubleshoot Your Clothes Dryer

As you can see, troubleshooting your clothes dryer can be easy if you know what to look for. If you don’t, it can be difficult and time-consuming to learn while trying different things that may or may not work.

Before getting a new dryer, make sure you try these troubleshooting methods, and if you have no clue where the problem might be coming from, don’t hesitate to call a professional.

The post How to Troubleshoot Your Clothes Dryer appeared first on Kitchen Infinity.

Did you miss our previous article…
https://www.thelavkitchen.com/?p=722

How to Build a Wooden Gate for Your Yard

How to Build a Wooden Gate for Your Yard

A wooden gate that is not maintained will look ugly and uninviting. It can also be a safety hazard for your family, pets, or guests. The good news is that you don’t need to hire a professional to build or repair your gate. You can do it yourself with the right tools and instructions.

You can build your good-looking wooden gate from start to finish and make it as durable as you like. Here’s how to do it.

The Tools and Materials Needed for the Job

Other than the gate, you’ll need a few common hand-held carpentry tools to get started. These include:

Tape measureWheelbarrowScrewdriverPencilMiter sawCordless drillSmall diameter drill bitCarpenter’s glueStraight edge rulerHammerShovelSafety glassesSpeed squarePosthole diggerHearing protectionOne-handed bar clamps

Steps to Building a Wooden Gate

Step 1: Preparations

When planning the materials needed to build your gate, it’s important for you to do a little math to make sure that both of the posts will be at the same height. The idea is to set one post in concrete in one corner of your yard and then make another post on the opposite side of your yard match up with it. Think through the location and weigh out all the considerations and locations where you want to build your gate.

Step 2: Dig Holes and Plumb Posts

Take the time to dig your post holes to have the same depth and size. You will also want to make sure that your posts are plumb before you set them in the concrete. Use a level or speed square to test for plumb and adjust as needed.

Step 3: Measure and Cut the Tongue and Groove Boards

Once you have the posts in place and are sure of the height, it’s time to measure and cut the tongue and groove boards. You will want to cut four pieces that are each 72 inches long. Use a measuring tape to make a pencil mark at 72 inches on each tongue and groove board. After that, cut the boards 72 inches long using your miter saw.

The frame for a basic wooden fence gate should be a simple box with four sides, usually smaller than the gate opening. Typically, you would use the same variety of wood you used on the fence. If you want a different color, redwood is sometimes used for large gates.

Step 4: Measure and Cut the Horizontal Bases

Next, you will need to measure and cut the horizontal bases for your gate. You will need a measuring tape to measure three 42-inch segments on two of the 1×6 cedar boards and not tongue and groove boards. Cut these segments, so you have three boards that are 42 inches long.

Step 5: Lay Out the Boards

Once you have your boards cut, lay them out on a flat surface and make sure they line up with each other. If the tongue and groove boards fall apart while doing this step, then move them to where they will not get in the way of your layout. This won’t be hard if you understand other carpentry work such as building a floating deck


Imag credit: https://diy.sndimg.com/

Step 6: Attach the Tongue and Groove Boards

You will need to clamp the boards together while attaching them with screws. This keeps the boards in place while you attach them. Attach them to the 1×6 horizontal brace boards underneath the 7/8-inch exterior screws. Pre-drill holes for the screws to eliminate splitting. Keep a close eye on the lower boards, so they don’t move out of position when you work.

Step 7: Anchor and Plumb the Brace Posts

You will want to make sure the posts are plumb or vertical. You can use a level to check this. To keep them in place, you will need to anchor them to the ground. If your soil is soft, you can use a post hole digger to make a hole deep enough for the post to be stable. Post length should be at least ⅓ longer than the planned height of your gate.

Pour some gravel into the bottom of the hole to allow for drainage and place a cement brick at the base of each post. Make sure your posts are tall enough to reach about three feet off the ground when they are all put together or tall enough to be bent around by hardware cloth. Cover with soil and tamp down until it is solid.

Take your next two posts and place them about a foot from each other. The closer they are, the more support you will have. Decide which direction you want your gate to swing, then place one of the corner posts in between them so that it is even on both sides. Use a level again to make sure this post is straight.

Step 8: Measure and Cut the Diagonal Brace

Next, use a measuring tape to measure the length of your hardware cloth and cut it so that it is just a bit longer than the width of your yard. You can use wire cutters for this task. Put the hardware cloth into place and attach it at each corner with hog rings, pushing them down on either side of the post.

Now it is time to install the diagonal brace. This will help keep the gate stable and prevent it from sagging. Measure from the top of one post to the opposite of the other post. Mark this spot on each post and then use a level to draw a line between the two marks. Lay your straight edge over this diagonal brace, staying parallel with the lines of the horizontal slats.

Make six pencil marks on a diagonal brace parallel to the top and bottom of each horizontal brace. Remove the temporary screws, then cut the diagonal brace with your miter saw at those six marks. Three cut pieces will be discarded, leaving two cut pieces that you’ll use as the diagonal brace.

Step 9: Attach the Diagonal Brace

Run a line of carpenter’s glue over the end of the diagonal brace, then drive in a 3-inch screw. Then, press the pieces on the gate in between the horizontal braces. Weigh down the two glued pieces with cinder blocks, rocks, and anything sufficiently heavy. Let the glue dry for about two hours, then remove the weight. Drive-in two more screws, one at each end of the diagonal brace.

Step 10: Cut Frame Pieces to Size with a Miter Saw

Using a miter saw, cut the pieces of the frame to size. You can start the gate by cutting the top and bottom pieces to the same width or length as you planned for, slightly smaller than the opening in the fence. Cut the upright side planks about 3 inches shorter than the height of the gate.

Step 11: Screw-in Top and Bottom Planks

Screw the top and bottom boards to the gate frame. Position the plank, so its edges are flush with the frame, then screw into place every 16 inches or so, using three screws per board. Drill a pilot hole for the screws before putting them in to not split to the wood. Fasten with deck screws, pre-drilling to keep the wood from splitting.

Screw-in Top and Bottom Planks
Image credit: https://4.bp.blogspot.com/

Measure from the top bend to the opposite bottom corner and make sure both sides are the same. As you start assembling the gate framing, it’s good to lay it out on a flat surface such as a patio or driveway. Attach the top and bottom rails to the side rails, ensuring it’s square.

Step 12: Cut an Angle Cross-Brace and Attach it to the Top and Bottom Rails

This will help to maintain strength and rigidity. Connect these to the frame boards that match the rest of the fence by using deck screws, pre-drilling. Use a miter saw to make your diagonal cut and place diagonally onto the box and trance with a pencil where the angles go. Place the cross-brace at a 45-degree angle extending from the bottom corner of the gate to the opposite corner of the top of the gate. But if it’s a rectangular frame, make a drawing to scale and measure the angle you’ll need with a protractor.

Step 13: Cut and Install the Planks

Place the first plank with its bottom side against the foundations and side rails and tight in between them at both ends. Use a combination square to ensure all of your planks are even before screwing down. Cut the planks using a table saw and secure them using deck screws, drilling pilot holes to keep your planks nice and clean.

Step 14: Design the Top of Your Gate

The top of your gate should have a nice curve to it. Cut the two 2x6s to the desired length and then use a jigsaw to cut out the arch. Drill pilot holes and then screw the boards together using deck screws.

Start by drawing an arc across the top of the fence gate using a string and a pencil, filling it with decorative curves of your taste. If you’re a woodworker, feel free to get fancy with your decoration. Use the jig to cut along your pattern.

Step 15: Install Hinges and Mount Your Gate

Once the top is finished, it’s time to install the hinges. Place them on the upper left and right corners of the gate. Pre-drill holes and then screw the hinges in place using 3-inch screws. The final step is to hang your gate. Have someone help you hold it in place while you screw it into the hinges.

Install Hinges and Mount Your Gate
Image credit: https://i.ytimg.com/

Leave about a 1/4 inch of distance on the hinge side of the gate. Using the cordless drill and screws included with the hinges, screw the hinges at the top, middle, and gate frame. Check to ensure the gate swings properly. Adjust the hinges to level, tighten or loosen the gate if necessary. Add diagonal cross brace to keep the gate square and prevent sagging. Remember that installing a brace with a little pressure in the opposite direction will make your gate warp. So, take diagonal measurements to check for squareness.

Step 16: Mount the Gravity Latches

Mount the gravity latches on the gate frame, one near the top and one near the bottom. The latch should be positioned so that it will snap into place when the gate is closed and hold the gate shut. Drill pilot holes and then screw in place using 2-inch screws.

Use a cordless drill and the screws included in the latches to screw the slide latches in place on the top and bottom of the gate. Screw the receiving section of the latches to the gate frame and mount the flip latch in a similar fashion at the center of the gate.

Step 17: Seal the Wood

Seal the wood with a sealant or weather proofing product. This will help protect the wood from the elements and keep it looking nice for years to come. You can use a paintbrush or garden sprayer to apply your sealant.

Try to cover the whole surface evenly, making sure you hit the bottom of the planks, which absorb more water than the end grain. This area is likely to rot or become discolored so let it dry for a couple of hours in dry climates or a day in more humid climates.

Step 18: Use Your Wooden Gate

Now that your wooden gate is complete, it’s time to enjoy it! Not only will it add beauty and privacy to your home, but it will also provide a secure barrier for your family and pets.

Use Your Wooden Gate
Image credit: https://thearchitecturedesigns.com/

FAQs on How to Build a Wooden Gate for Your Yard

What are the benefits of having a wooden gate at home?

The benefits of using a wooden gate over another material are many. If you’ve already learned how to build your own house, adding a gate with the traditional look can be the best decision. It can blend in with all home styles, from modern to Victorian to an earthy farmhouse. Unlike other materials, it requires very little maintenance and looks as good as the day you installed it years later.

How can you attach pickets to the frame?

Use one angled piece from the bottom of the hung side to the corner of the latch side. Lay out pickets on the frame to check spacing and mark when you’re not satisfied.

Final Thought on Building a Wooden for Your Yard

Wooden gates provide a sense of privacy and security for your home and yard. They also add beauty and value to your property. Installing a wooden gate is a relatively easy project that can be completed on the weekend.

If you have any questions or need assistance with this project, don’t hesitate to contact a professional contractor. They will be able to help you with the planning and installation of your wooden gate, ensuring that it is a beautiful and safe addition to your home.

The post How to Build a Wooden Gate for Your Yard appeared first on Kitchen Infinity.

Did you miss our previous article…
https://www.thelavkitchen.com/?p=717

Types of Under-Sink Shutoff Valves

Types of Under-Sink Shutoff Valves

Also known as fixture shut offs or stop valves, under-sink valves allow you to turn off the water to the sink without shutting it off to the whole house. The number and type of fixture shutoffs you choose will depend on how many fixtures there are and where they’re located.

The following guide will take you through different types of shut off valves that can help you identify what you have under your sink.

What is Shut off Valve?

Shut off valve is a valve that stops the flow of fluid in a plumbing system. This valve cuts off the water supply to a pipe once activated. However, shut off valves are not exclusive to plumbing systems.

They’re also used to regulate the flow of gasses.

ngle Stop Valve

The Angle stop valve is the most popular of shut off valves, being used in over 75% of homes. The valve can be rotated around its main axis to cut-off water flow. The design of the angle stop valve allows it to rotate easily, but it also makes them prone to wear and more likely to leak.


Image credit: https://images.saymedia-content.com/

Also known as a compression valve, an angle stop valve is found on the pipe which exits the wall. It allows you to turn the water off to the specific toilet or faucet when replacing it without shutting all water off to the entire house. Angle stop valves are very durable and can last many years without issues. In addition, angle stop valves are generally found in either brass or chrome-plated finishes.

Straight Shut Off Valve

Straight stop valves are typically found when the water supply pipe comes out below the flow or cabinet. A straight stop valve keeps the water from traveling in the same direction where it came from before entering the valve.

Straight Shut Off Valve
Image credit: https://assets.leevalley.com/

Straight stop valves have handles that point in the same direction as the valve, and handles are located in the middle of the valve body between the inlet and outlet ports. Similar to angle stop valves, a straight stop valve also allows you to turn off the water supply to one specific area. Also, you can do the replacements and maintenance on these appliances without shutting the water supply in the entire house.

Iron Pipe Stop Valve

Iron pipe stop valves are fitted with iron-pipe sized threads to thread a female inlet port. This type of under sink shut off valve can also be adapted to other pipes by using a male iron pipe adapter that can be fitted into plastic pipes or copper pipes.

Iron Pipe Stop Valve
Image credit: https://www.pvcfittingsonline.com/

This shut off valve can be screwed or unscrewed from the end of the water pipe. You’ll only need two pliers. One to hold the water line in place and the other to tighten the valve.

Copper Sweat Shut Off Valve

A copper sweat valve is usually at the end of copper pipe sections. They are threaded to screw into the end of the pipes. Sweat is a term used by plumbers for soldering. This type of shut off valve is known as copper sweat valve because it needs soldering to copper pipe, and it’s made of copper.

Copper Sweat Shut Off Valve
Image credit: https://m.media-amazon.com/

To install these copper pipes, you’ll need common household tools like emery cloth, solder, flux, and torch. The copper pipes are installed at the time of building construction. Professional plumbers prefer this permanent and low-cost solution because they last longer.

Push Fit Stop Valves

Push fit stop valves use a collet to grip the pipe. Also known as push on stop valves, these valves are inserted into the end of the pipe, and the pipe is pushed home so that the collet grips the pipe tightly. They consist of a rubber o ring and stainless steel locking teeth.

Push fit stop valves are easy to install and can be used with copper, PEX, and CPVC pipe. The valve grips onto the pipe with metal teeth and creates a watertight seal with a plastic o ring. The small CPVC is inserted inside its intake port, and cement used with CPVC often works with PVC.

However, the adhesive used on PVC doesn’t bond with CPVC. It’s kind of overwhelming learning about this at first, but once you grasp the idea, you can fit a CPVC stop valve to a pipe by yourself.

PEX Shutoff Valve

PEX Shutoff valves are an innovation to help with fitting a pipe. The one-way valve does not let anything in or out of the line. It’s great for reducing water backflow into your home, but it can’t reduce pressure or prevent scaling on the inside of the pipe.

PEX Shutoff Valve
Image credit: https://images.fineartamerica.com/

PEX shutoff valves are more expensive than copper or brass shutoff valves. This stop valve is often attached to pipes with crimp rings or clamp rings. A ring compression tool compresses the crimp ring against the outside of the pipe while a clamp ring tool squeezes a tab on one side of the ring.

The PEX stop valves can be removed, but you have to cut off the ring, which can cause damage to the pipe. This means that the pipe needs to be shorted to get a fresh section of pipe for the new valve.

CPVC Stop Valve

CPVC stop valves are one of the more expensive types of stop valves. CPVC stop valves are used in CPVC piping systems. CPVC stands for chlorinated polyvinyl chloride. They use a specific type of cement known as glue when installed. In addition, a CPVC valve can be used on PVC pipes. But PVC adhesive doesn’t bond well with CPVC material.

CPVC Stop Valve
Image credit: https://images.thdstatic.com/

Compression Shutoff Valve

A compression stop valve is used on copper pipes. It consists of a compression nut that squeezes a brass ring into the space between a water pipe and its body. Buildings with copper water pipes use compression stop valves with a compression intake port. This allows for more compression power and reduces the need for repairs.

Ball Valve

A ball valve is a type of stop valve that uses a ball to control water flow. The valve has a threaded body and nut that screws into the water pipe. This valve is quite large and features a lever handle. It’s commonly used in places where a quick turn-on is necessary, such as the main pipe.

You can open and close it fully with a simple quarter-turn of the lever. The internal ball will align with the pipe when the valve is open, allowing water to gush. The ball will rotate 90 degrees and completely block the hole when closed.

FAQs on Types of Under-Sink Shutoff Valves

Where is the shutoff valve located at home?

The main shutoff valve for the home is generally found on the perimeter of the house. A good place to look is where the water first enters your home. The smaller valves can also be found close to appliances and fixtures such as toilets or faucets.

Final Thought on Types of Under-Sink Shutoff Valves

Shutoff valves are an essential part of any plumbing system. They allow you to turn off the water supply to a particular area, which can come in handy when you need to make repairs or in an emergency. Also, if you’re experiencing low water pressure in your kitchen sink, the first place to check is the shut off valve. Installing these stop valves is an easy task if you know where they are and which type to use.

The post Types of Under-Sink Shutoff Valves appeared first on Kitchen Infinity.

Did you miss our previous article…
https://www.thelavkitchen.com/?p=703

A Picture Gallery of Ducks

A Picture Gallery of Ducks

Ducks are so beautiful, but it can be hard to get a good look at them. They move around quickly and dive underwater when you try to take their picture. We all know that ducks make great pets, but they’re also wild animals. You might not have the time or space for a pet duck in your home.

Even if you did, there’s no guarantee that your neighbors will approve of one. This is where this picture gallery comes in handy. It’s easy to browse through hundreds of pictures of different kinds of ducks without ever leaving your house or getting wet feet.

In the following gallery pictures, you’ll discover markings, information, and trivia about various types of ducks around the world. Keep reading.

merican Wigeon

The American Wigeon is a beautiful dabbling duck that you might see swimming in ponds and lakes across North America. Its scientific name is called Anas Americana. It has a heavily speckled head, and the males have a white forehead and wide green stripe behind the eye while females are generally plainer.


Image credit: https://nas-national-prod.s3.amazonaws.com/

Both genders have a distinctive light blue bill with a black tip. While they are widespread, these ducks can be wary, though they can mingle in mixed flocks with mallards and duck species.

Northern Shoveler

The Northern Shoveler is a beautiful North American dabbling duck. It has a pinkish bill and white specks all over its body, giving it the appearance of being wearing makeup. The scientific name for this duck is Anas clypeata.

Northern Shoveler
Image credit: https://cdn.britannica.com/

This duck isn’t only recognizable for its bold, colorful plumage and for having the biggest bill of any North American duck species. They use this bill to feed along the surface of the water. This duck will also tip its backside up to feed on aquatic plants along the bottom of shallow ponds and lakes.

Mallard

The mallard is one of the most common and recognizable ducks in the world. It’s also a popular game bird. Mallards frequently crossbred with other duck species, making it a challenge to identify some of their offspring. Its scientific name is called Anas platyrhynchos.

Mallard
Image credit: https://www.thespruce.com/

Males have the more colorful plumage, including the iridescent blue, green head, and distinctive tail curl, while females are mottled brown. As a dabbling duck, mallards feed in shallow rivers, ponds, and lakes and become quite tame near human habitation.

Ruddy Duck

Ruddy ducks got their name from their characteristic chestnut head and neck. They are also one of the most widespread ducks in North America. You can find these ducks in every U.S. state as well as much of Canada. Males are a rich chestnut brown, while females are more camouflaged dingy brown.

Ruddy Duck
Image credit: https://cdn.download.ams.birds.cornell.edu/

Winter males resemble females, and they’re relatively sluggish ducks on the surface and frequently dive to avoid predators and feed. Its scientific name is Oxyura jamaicensis.

Mandarin Duck

The mandarin duck is a strikingly colorful duck endemic to Asia, Russia, and Japan, with an isolated feral population in the United Kingdom. These bold birds are perching ducks closely related to the North American wood duck. They’re very popular in Asian artwork, thanks to their distinctive beauty.

Mandarin Duck
Image credit: https://putakputak.com/

The Chinese lores also use the mandarin duck as a symbol of wedded bliss and marital fidelity. Its scientific name is called Aix galericulata.

Smew Duck

The smew duck is a small diving duck found in Europe, Asia, and North America. This bird is easily identified by its striking white crest and black body. The male smew has a bright orange beak, which it uses to find fish underwater.

Females lack white coloration and are mostly gray and brown with a white cheek patch. Its scientific name is called Mergellus albellus.

Harlequin Duck

This medium-sized diving duck is found in Western Canada and throughout Alaska, especially on rocky coasts. The harlequin duck has bold plumage both in terms of color and patterns.

Male ducks have red, white, and blue-gray plumage with white crescents, spots, and lines, while females are plainer brown with distinctive white markings on the head. Its scientific name is called Histrionicus histrionicus.

Canvasback Duck

This is North America’s largest duck. It has a large rounded head with white underparts, neck, and upper back. The male ducks are entirely black, while the female ducks are brown with pale patches on their face and neck.

The sloping head shape and long, black tapered bill are distinctive field marks for this species and help distinguish it from the redhead. Its scientific name is called Aythya valisineria.

Common Goldeneye

This is a small diving duck found in most parts of the United States and Canada. The male has a distinctive white cheek patch on its iridescent black head and a bright yellow eye, while the female is mostly brown with some light barring on the breast.

The common goldeneye has a shorter bill than most diving ducks and can often be seen swimming on the surface of the water, looking for small mollusks and aquatic insects to eat. Its scientific name is called Bucephala Clangula.

Ring-Necked Duck

This medium-sized diving duck is found in most of Europe, Asia, and North Africa. The male has a distinctive ring around his neck, while the female’s breast is finely spotted with brown markings.

The ring-necked duck dives for food on the bottom of lakes or ponds, and its diet consists mainly of aquatic plants. Its scientific name is called Aythya collaris.

Northern Pintail

The male northern pintail is the most strikingly handsome of all the ducks with his long, slender neck and tail. He can be found in open countries across North America, Europe, and Asia. While many duck species have blunt, stubby tails, the northern pintail has a distinctive long, thin tail that’s often held at a sharp upward angle.

Northern Pintail
Image credit: https://www.marylandzoo.org/

As a dabbling duck, northern pintails feed by tipping forward into the water to forage on aquatic plants, and one-third of their diet consists of fish and small animals. The northern pintails are susceptible to lead poisoning from short pellets that sink into ponds where they feed. Its scientific name is called Anas acuta.

FAQs on Picture Gallery of Ducks

What is interesting about ducks?

Ducks are also called waterfowl because they’re found in places where there is water, such as ponds, streams, and rivers. They can live up to 20 years depending on the species and if cared for. Their egg production is affected by daylight as if they’ll lay more eggs when there is more daylight.

Final Thought on Picture Gallery of Ducks

As you can see, there are various types of ducks, and each species has a different value. Some lay eggs while others are bred for their meat. Ducks have provided humans with more than they need to survive. But just like how to care for baby birds, ducks also need to be cared for whether they’re at home or in the wild.

The post A Picture Gallery of Ducks appeared first on Kitchen Infinity.

Did you miss our previous article…
https://www.thelavkitchen.com/?p=671

Window Air Conditioning Tricks

Window Air Conditioning Tricks

Window AC units are a great way to stay cool during the hot summer months. But at the same time, they can be tricky to install and maintain. The wrong installation can lead to the AC unit falling out of the window, or not cooling your room as well as it should.

In this article, I will give you some tips for installing and maintaining your window air conditioner so that it works well all summer long. Let’s get right into it.

Installing and maintaining your ACs correctly

Understanding howdifferent types of air conditioners work is the first step in learning how to maintain them.

For example, most window ACs are cooled with simple, CFC-free R410A refrigerant gas. For these types of air conditioners, water is the cooling agent that absorbs heat from inside the room and passes it through the AC’s compressor.


Image Credit: http://popularmechanics.com

The compressor increases the pressure of the water vapour until it becomes a hot gas (steam). The gases are then released through a set coil outside your home which cools it down before pumping it back into your room. The AC fan blows cool air into your house or office space to lower its overall internal temperature window air conditioning tips

With that said, installing a window AC unit is very similar to installing a normal window. The first and most important step is measuring your window. Make sure you have the right size AC unit for your window otherwise it will not cool your room properly or may even fall out of the opening.

Once you have the correct sized air conditioner, carefully read over the installation instructions before taking any steps. A lot of units can be flipped horizontally or vertically depending on what suits your window best, so make sure you’re doing that correctly as well.

After you’ve got everything set up, it’s time to plug in your AC and enjoy some cold air. Because most units are installed inside a window, keeping them dust-free is important for keeping them running smoothly and reducing wear and tear.

Make sure to keep an eye on your filters and have them replaced when needed. Also, because you are dealing with water vapour, do not place anything that can melt or catch fire near your unit.

The last step is making sure the AC itself stays secure in the window so it does not fall out. Some ACs come equipped with locks but if yours does not have one, installing a few screws at the top of the unit will usually suffice to make sure it doesn’t accidentally slip out of its casing window air conditioning tricks

The importance of having air conditioners installed securely

As we mentioned before, one of the dangers of installing a window AC unit is that it can fall out of the window.

This happens most often when the window opening is too narrow for the AC unit, or if there is no installation support on the inside of the window frame.

To help prevent your air conditioner from falling out, make sure you are using the correct size unit for your window and that it is properly installed. You can also use a locking mechanism to keep the AC in place.

If you are still worried about your AC unit falling out, it’s best to contact a professional to install it for you. They will know how to properly secure your air conditioner so that it doesn’t move an inch over the long term.

Other factors to consider

In addition to proper installation and maintenance, there are a few other things you can do to keep your window AC unit running smoothly all summer long.

One of the most important things to do is to keep the area around your AC unit clear. This means not placing any furniture or other objects near the unit that could obstruct the airflow.

How to Install Window Air Conditioner Units | Clera Windows + Doors

Image Credit: http://clerawindows.com

Finally, set a schedule for using your AC so that you’re not turning it on and off constantly. This will help reduce wear and tear on the unit and save you some money on your energy bill.

Window air conditioning freeze-ups

Window air conditioner freeze-ups do happen, but there are steps you can take to lessen the frequency at which they occur.

The first is keeping water out of the unit. A window AC unit pulls in air from outside and then pumps it back into your room. If that air has any moisture in it, it will lead to ice forming on the coils which prevent it from cooling down your space again.

Just like for all other units, avoiding places where frost can form is important for keeping your unit running smoothly throughout the year.

Finally, be sure not to cover your AC with blankets or furniture when it’s turned on as this can trigger ice build-up very quickly.

Window Air Conditioning Tricks – FAQ

What is the best way to clean the filters on my window air conditioner?

The most effective way to clean filters on a window air conditioner is by vacuuming them with the brush attachment. You can also use a damp cloth to wipe them down, but be sure to let them dry completely before putting them back in the unit.

How can I improve the airflow through my window air conditioner?

If you are having trouble getting enough airflow through your window air conditioner, try cleaning or replacing the filter. You can also make sure the unit is in an open area with plenty of room for air to circulate.

What should I do if water starts leaking from my window air conditioner?

If water starts leaking from your window air conditioner, the first thing you should do is turn it off and unplug it. Next, try to determine where the leak is coming from and take appropriate action to fix it. If you are unable to fix the leak yourself, contact a professional for assistance.

Can I use a space heater with my window air conditioner?

Yes, you can use a space heater with your window air conditioner as long as it is placed at least three feet away from the unit. Be sure to keep a close eye on the space heater while it is in use to avoid any potential fires or other hazards.

Final thoughts on window air conditioning tricks

In this article, we’ve gone through a few window air conditioning tricks that you can use to keep your home cool and comfortable. By following these tips, you can save money on your energy bills and make the most of your air conditioning unit.

Always take care of your window air conditioning unit by keeping it free from dirt, debris, and other materials. This will help to keep the unit running efficiently for as long as possible. If you have any trouble with your unit or you notice something is wrong with it, be sure to contact an expert who can give you specific advice for your situation.

Finally, check out this article on the best air conditioners to buy if you’d like to get your hands on the best ACs in the market right now.

The post Window Air Conditioning Tricks appeared first on Kitchen Infinity.

Did you miss our previous article…
https://www.thelavkitchen.com/?p=664

8 Best Furniture Rental Companies

8 Best Furniture Rental Companies

Moving into a new home can be an exciting time, but it can also be stressful. You may not know where to start furnishing your new place, and you probably don’t have the money to buy furniture. Renting furniture is a great way to get what you need without spending too much money.

Furniture rental companies offer everything from living room sets, bedroom suites, and dining tables so that you’ll always have what you need at an affordable price. The best part about renting furniture is that if something breaks or gets damaged, it’s no big deal because all of the furniture in question will be replaced with new pieces by your local rent-to-own company.

So, if you’re looking to rent furniture for your apartment, here are the best furniture rental companies available:

1. Brook Furniture Rental

Brook furniture rental is the best furniture rental company out there because they offer everything you could need for home furnishings. With so many choices available in one place, it’s easy to see why Brook Furniture Rental is the top choice for so many people. Brook furniture rental consists of free professional design services, white glove delivery, and super-fast turnaround time.

Customers can rent by item, room, or fast path to furnish an entire room. You can also choose from one, two, three, six, and twelve-month leases with significant discounts with a six and twelve-month agreement. Select the number of bedrooms, the level of furnishings you’re looking for, and choose from three pictures and three-color palettes to indicate what most closely matches your taste.

From there, the Brook will show you a sample package with items for the living, dining, and bedrooms with the option to swap out or add needed items before purchasing. Once you’ve signed a lease, Brook can deliver your furniture in as few as one or two business days, and if you’re unsatisfied with what you’ve chosen, the company also offers free returns or exchange within the first week.

2. Feather Furniture Rental Company

Feather is an excellent choice for big-city residents because it’s geared toward apartment living and small spaces. It’s available in all major metropolitan areas, such as New York City, Los Angeles, San Francisco, Houston, Dallas, Austin, Virginia, Maryland, and Washington DC. It also caters to those living in small spaces.


Image credit: https://content.fortune.com/

It’s the only rental company on this list that makes its rental furniture, and furniture is made from sustainable materials like FSC-certified wood and glues and stains with low VOCs. Feather’s plan includes one month, three-month leases, and annual membership. Rentals without membership are more expensive, making them smarter for staging and selling homes than for long-term use.

Feather furniture rental membership requires a high monthly minimum, making this service best for people who want to rent an entire apartment’s worth of furniture and not a few items. An annual membership might be a good option for roommates looking to split the furniture cost and don’t want the hassle of moving furniture when they find a new place to live.

Once the subscription period ends, customers can renew, swap out furniture or buy the items outright minus the rental fees already paid. Feather also offers discounted packages for bedrooms, living rooms, dining rooms, and home offices with the monthly cost of approximately $26 for dining room sets or full bedroom spreads, including a brand new mattress.

Opting for feather, you can renew your lease and swap your furniture for something else. Individual furniture pieces from well-known brands like West Elm are also available.

3. Cort Furniture Rental Company

Cort is a good example of companies that specializes in flexible leasing deals. The company offers furniture rental services for every room in the apartment with no hidden fees or additional charges. Besides, Cort allows customers to keep the items they rent even when their arrangement is over, which means you can save thousands of dollars on new furniture when moving out.

Cort Furniture Rental Company
Image credit: https://onhavanastreet.com/

Cort has a wide variety of furniture and electronics offerings, making it the most accessible of the many furniture rental companies out there. Like many companies that offer this service, the longer the rental contract, the lower an item’s monthly rent. It allows renters to buy out items when their rental term is up.

Plus, the rental payment made on the item doesn’t necessarily go towards that payment, although Cort will sell the item at a discounted price. Cort furniture outlets are also an option for aspiring buyers, where they offer gently used pieces at steep discounts. This company also gives renters one week to decide if an item will work in their space once delivered.

If not, they’ll pick it up and replace it free of cost. The minimum rental term is one month, and the brand also has monthly minimums for rentals. If you’re using a debit card for payment, Cort requires a credit check and may also require a security deposit. Their services work well for students and military members who can choose from whole apartment decor packages.

4. CasaOne Furniture Rental Company

With over 4,000 items, CasaOne rents home, office, patio furniture, gym equipment, and holiday decor. In addition to mid-century style bedroom, kitchen, office, dining, and living room furniture, CasaOne also offers interior design services, home staging, gym equipment, and patio furnishing rentals.

CasaOne Furniture Rental Company
Image credit: https://miro.medium.com/

They have one of the largest collections for furniture, thanks to the 4,000 items in their inventory. The company also provides rental options for seasonal decor, bedding, rugs, wall art, and picture frames. CasaOne also features brand name furniture rentals from West Elm and Article alongside offerings from brands with less name recognition that still deliver on style.

CasaOne services several metropolitan areas across the country. The price of items varies depending on the rental term, varying anywhere from 12 months. There is also a rent-to-own option. It also offers the opportunity to purchase the rental furniture by charging the retail amount minus the already paid rental fees.

The company also charges extra for early rental contract termination and furniture insurance. Still, it will deliver and assemble any rented items for no additional charge within three business days and also pick your rentals when you’re ready to move out.

5. Fernish Furniture Rental Company

Drawing its inspiration from mid-century and Scandinavian furniture design, Fernish provides premium and trendy rental options. Although Fernish is only available for customers in Los Angeles, Southern and Coastal Ventura County and Orange County, CA, Seattle, WA, and Dallas, Fort Worth, TX. This brand shows promise as a rental purveyor of on-trend furniture from the likes of CB2 and Floyd.

Fernish Furniture Rental Company
Image credit: https://www.treehugger.com/

About a week or two after placing an order, a team will deliver, assemble and arrange the furniture. If an item isn’t the customer’s preference, they’ll let Fernish know within three days, and the customer can swap it out at no additional cost. At the end of the rental term, a renter can renew, swap out items for free, or buy7 a piece of furniture by paying the difference between the total value and the rental amount that’s already paid.

If you live near the Fernish service area and swap out their furniture every few years, this rental might be the right one for you. This brand offers durable furnishings that can be used repeatedly by replacing parts and uses an 11-step refurbishment and sanitization procedure that utilizes sustainably sourced materials.

6. Rent-A-Center

Rent-A-Center is one of the largest furniture rental companies in the United States. It offers furniture, appliances, and electronics for rent with no long-term contracts required. Customers can choose to pay weekly, biweekly or monthly installments, and all major credit cards are accepted.

Rent-A-Center
Image credit: https://images.barrons.com/

Rent-A-Center also offers a free delivery and set-up service. There are no long-term contracts, and it also offers the option to upgrade rental items at any time. It offers electronics, furniture, appliances, computers, smartphones, and home decor with locations nationwide. Renters can order online or visit local stores to pick out items, finalize details, set up payment plans, and arrange same-day delivery.

The company also offers repairs and services for no additional cost during the lease term and includes upgrading products for free. If you want to buy items, they’ll offer a discount for paying off your balance early, and there are no long-term contracts, meaning that you can cancel or upgrade at any time.

7. Oliver

Oliver’s use-friendly website and interior design style quiz help get you started on finding the perfect pieces that fit your style. They have an extensive product range, including everything from bedding to lighting, with all prices indicated so you’ll know exactly what you’re spending.

The brand’s signature design quiz gives new furniture renters a jumping-off point with pre-designed rooms that can be tweaked to their liking. Once finished, the results are displayed with pieces that fit your style, rent price range, and more once finished. The site also offers access to complimentary design consultants who can help craft that perfect look.

The brand offers three plans suitable to short and long-term renters, plus those looking to rent one. Pricing is set up so that the longer the rental term, the lower the monthly cost. There are no delivery, assembly, and set up fees for the beginning of a rental term, and subscribers to the brand’s long-term plans are allotted one free furniture swap.

Subscribers to Oliver’s one-year upfront plan in which renters commit to a year’s worth of Oliver get a 10 percent discount on their rentals. Oliver is available in the Dallas Fort Worth metro area, Los Angeles, San Diego, and San Francisco.

8. Aaron’s

Aaron’s offers furniture, appliances, and electronics leasing through its Aaron’s Plus plan. Customers can choose to lease single items or an entire room of furniture. Delivery and set-up are free, with the exception of in-home entertainment installations. Customer service is available seven days a week.

There is no early termination fee; however, customers must return the merchandise in good condition. This company also encourages you to shop by style, from casual to contemporary, so choosing what you like is simple. Offering packages, special deals, and sales, this national brand is a rent-owned chain. Not only can you own items once you complete your payment, but you can pay off your balance early.

The Everest brand rents furniture, appliances, electronics, computers, and more to consumers looking for cheap rentals with no credit check required. Everest is a great option if you are on a budget but still want quality products. Many vendors are partnered with the best furniture rental companies, so you have brand names you can trust at affordable prices.

Customers can also choose to purchase the items they rent through the company if they fall in love with them. If you’re looking for a more vintage vibe, then Everest offers interesting pieces for bedrooms, living rooms, and dining rooms that are new but look like you picked them at a hip second-hand store. This service is only offered in the New York City Area.

FAQS about Best Furniture Rental Companies

How do you choose the best furniture rental companies?

Opt for the one that showcases a variety of furniture styles and features additional offerings like home decor, electronics, and service in different country areas. For instance, CasaOne is chosen because it offers a wide range of items, including workout equipment. Feather is also a good choice because it’s tailor-made for city dwellers.

Who is furniture rental good for?

Furniture rental is good for individuals who might not want to coordinate moving their furniture. And it’s not ideal for individuals who may risk falling behind on payments.

Final Thought about Best Furniture Rental Companies

Best furniture rental companies often have amazing deals and discounts to help you save money on your decorating project. Be sure to check online and in-store for special offers before making your final decision. Furniture rental companies make it easy and affordable to get high-quality furniture for your home.

The post 8 Best Furniture Rental Companies appeared first on Kitchen Infinity.

Did you miss our previous article…
https://www.thelavkitchen.com/?p=655

Brown Patch Lawn Disease

Brown Patch Lawn Disease

Brown patch lawn disease is a common problem that affects many gardens.

Brown patches on your grass are not always caused by the same type of fungus or bacteria, so it’s important to have a professional identify the problem before you try to fix it yourself.

In this article,  we will discuss what brown patch lawn disease is, the signs of brown patch lawn disease, how to prevent and treat brown patch lawn disease, and where you can find more information about diagnosing and treating brown spot diseases in your yard. Keep reading to find out more.

What Is Brown Patch Lawn Disease?

Brown patch lawn disease is a fungus that affects grasses. It can cause patches of your lawn to turn brown, and in severe cases, it can kill the grass. The fungus thrives in hot, humid weather, and so the best way to prevent brown patch lawn disease is to make sure your lawn is healthy and well-maintained.

Image Credit: http://scotts.com

By watering your lawn properly and mowing it regularly, you can help to keep the grass healthy and reduce the chances of brown patch lawn disease. If you do notice signs of brown patch lawn disease, it’s important to take action right away to prevent the fungus from spreading.

Alternatively, you can also treat brown patch lawn disease with fungicides. There are many different types of fungicides available, so it’s important to talk to a professional about which one is best for your situation.

Signs Of Brown Patch Lawn Disease

The most common sign of brown patch lawn disease is a large, circular patch of brown grass. The edges of the patch will be well-defined, and the centre will be relatively dry. In some cases, you may also see small patches of pink or purple fungus growing on the edge of the brown patch. If you see any of these signs, particularly if you live in an area where the fungus is common, it’s important to have your grass tested.

Another common sign of brown patch lawn disease is the appearance of lesions on the leaves of the grass. These lesions will be dark green or brown, and they will often have a yellow halo around them. If you see any lesions on your grass, it’s important to contact a professional right away.

How To Prevent And Treat Brown Patch Lawn Disease

Brown patch lawn disease is difficult to eliminate, but there are some things you can do to ensure that it doesn’t spread or get worse. The best way to prevent brown patches is to keep your grass healthy by regularly mowing, fertilizing, watering, and aerating it. If you have prolonged periods of hot weather every year, consider installing shade trees so that your yard is cooler. If possible, choose two different kinds of grasses for your yard so they don’t all die at once if one type gets sick.

Moreover, you can also treat brown patch lawn disease with fungicides. There are many different types of fungicides available, so it’s important to talk to a professional about which one is best for your situation.

If you do see signs of a brown patch, it’s important to take action right away to prevent the fungus from spreading. You can treat the fungus with fungicides, or you can try to remove the affected areas of grass and replace them with new sod. It’s important to remember that brown patch lawn disease can be difficult to get rid of, so you may need to take these steps more than once to get rid of the fungus completely. Speaking of fungus, here’show to get rid of mold

Finally, it’s important to remember that not all patches of brown grass are caused by brown patch lawn disease. Many other things can cause your grass to turn brown, such as drought, pests, and poor soil quality. If you’re not sure what’s causing the problem, it’s best to contact a professional so they can diagnose the issue and recommend a course of treatment.

Other Important Considerations

If you hire a company to diagnose and treat your lawn, make sure that they use environmentally-friendly fungicides. Some types of fungicide can be harmful to the environment and even pets and children. It’s also important to water your lawn after treating it with fungicide because too much moisture will encourage the fungus to grow again.

You should also remember that brown patch disease is more likely to attack the cool-season grasses in your yard. Tall fescue, Kentucky bluegrass, and ryegrass are all very susceptible to brown patch disease. This means that some parts of your yard may die while other parts thrive depending on what type of grass grows there naturally.

Bermuda grass is less susceptible to brown patches, so if you have this type of grass in your yard, you’re less likely to see signs of fungus.

In short, brown patch lawn disease is a difficult fungus to get rid of, but there are some things you can do to prevent it from spreading or getting worse. If you see any signs of the disease, contact a professional right away so they can recommend a course of treatment.

Remember that not all patches of brown grass are caused by brown patches, so it’s important to diagnose the problem before taking any action.

The weather conditions

Humid weather combined with cloddy soils can cause a fungal brown patch. The fungus that causes the disease proliferates in moist conditions. To prevent brown patch lawn disease, strive to keep your grass as dry as possible. Watergrass deeply and infrequently to encourage deep root growth.

How to Identify, Control and Prevent Brown Patch - Lawnstarter

Image Credit: http://lawnstarter.com

Brown patch lawn disease – FAQ

When does brown patch lawn disease show up?

Brown patch lawn disease often appears in late summer or early fall.

What are the symptoms of brown patch lawn disease?

The most common symptoms of brown patch lawn disease are circular patches of dead, brown grass. These patches can often be several feet across and can spread rapidly.

What causes brown patch lawn disease?

Brown patch lawn disease is caused by a fungus that thrives in moist conditions. The fungus feeds on the grass’s leaves, causing them to die and turn brown.

How can I treat brown patch lawn disease?

There is no cure for brown patch lawn disease, but you can take steps to prevent it from spreading. You can start by mowing your lawn at the proper height and removing dead or dying patches of grass as soon as you notice them.

Finally, try to keep your lawn as dry as possible; don’t let water stand on it for long periods, and make sure that you’re not over-watering your lawn.

What do dark rings around the patches mean?

If you see dark rings around the patches of brown grass, it means that the fungus is also attacking the roots of the grass. This can kill the grass and cause it to turn black.

What should I do if my lawn is severely affected by brown patch disease?

If your lawn is severely affected by brown patch disease, you may need to replace it with new grass. You can start by removing all of the dead or dying grass and then tilling the soil to loosen it up. Next, spread a layer of topsoil over the soil and then sow the new grass seeds. Finally, water the area well and keep it moist until the seeds germinate.

Final thoughts on brown patch lawn disease

In conclusion, brown patch lawn disease is a serious problem that can cause a lot of damage to your lawn. Early detection and treatment are essential for preventing any long-term damage. Be sure to keep an eye on your lawn and contact a professional if you suspect that your garden may have this disease.

For further reading, check out this post onhow to test soil ph. This will ensure that your soil isn’t too acidic and won’t end up having trouble absorbing the right nutrients.

The post Brown Patch Lawn Disease appeared first on Kitchen Infinity.

Did you miss our previous article…
https://www.thelavkitchen.com/?p=638

How To Control Aphids On Indoor House Plants

How To Control Aphids On Indoor House Plants

Growing flowers and shrubs indoors has a lot of benefits, ranging from fresh air to improved home decor. However, the benefits can dwindle quickly when these houseplants are under attack by pests such as aphids. Aphids are small, sap-sucking insects that can cause a great deal of damage to plants.

They typically congregate on the undersides of leaves, feeding on plant sap. This can lead to reduced growth, wilting, and even leaf drop. Fortunately, there are several ways of controlling aphids on indoor plants. Keep reading.

What are Aphids?

These are small, soft-bodied insects that feed by sucking juices from plants. They are usually green or black and can be found on the undersides of leaves. Aphids can cause a great deal of damage to plants, leading to stunted growth and leaf drop. However, these insects move rather slowly, making indoor plants relatively easy aphid control.


Image credit: https://bdn-ss-hh.s3.amazonaws.com/

Identifying Aphids

Aphids are tiny insects that are nearly invisible to the naked eye. For instance, adult aphids are under ¼ inch and can be about any color from brown, red, and blue. Most aphid species can appear white, black, brown, grey, yellow, light green, and even pink.

Some may have a waxy or woolly coating. Adults are also wingless, but most species develop a winged form when populations become crowded to allow them to travel to other plants when food quality suffers.

What Do Aphids Do to Plants

Like most indoor plant pests, aphids feed on a houseplant by sucking the leaves, buds, and flowers sap. They like to cluster and feed on a plant’s new growth and flower buds, which can cause stunted growth, deformed leaves or flowers, yellow leaves, and leaf or bud drops. As aphids feed, they release a sticky substance, so you may notice the area around your plant is sticky before you even see tiny bugs on your plants.

What Do Aphids Do to Plants
Image credit: https://plantdoctor.co.nz/

phids Life Cycle

The life cycle of aphids is a bit different depending on the species. Some females give birth to live nymphs while others lay eggs. They multiply quickly, and the full life cycle can be as short as one week. The aphid eggs are super small, so you’ll never see them.

Outside, their eggs survive the winter by attaching to woody growth. And in the spring, the eggs hatch into females. The females then give birth to a nymph without mating. Males are born in the fall and begin to mate with females to produce eggs in preparation for the long winter.

There’s no winter indoors which can slow their reproduction, and female aphids can continue producing nymphs all year round without stopping. Thus, making the aphid population get out of hand in indoor plants.

Methods of Control

Tools and Materials

Small spray bottleSticky trapsCotton swabInsecticidal soapScissors or small pruning shearsNeem oilRubbing alcoholDish detergent and waterHomemade insect spray

Get Rid of Aphids With Insecticidal Soap

Insecticidal soaps can be bought at most garden centers. It comes in a concentrate, and you will need to mix it with water according to the directions on the bottle. It is important to follow the directions as too much soap can harm your plants.

Spray the plant leaves with the soap mixture, ensuring good coverage. Pay special attention to the undersides of the leaves where aphids like to hide. Do not spray plants in direct sunlight, as the soap can cause the leaves to burn. This method also works well on outdoor plants and helps get rid of aphids on tomato plants.

Alternatively, you can get rid of aphids on succulents and other houseplants using horticultural oil instead of dish soap. No matter the method you choose, make sure you combine the ingredients in a large bottle and shake until blended. If you know how to clean household leaves, this will be much easier.

Get Rid of Aphids With Neem Oil

Neem oil is a natural pesticide made from the seeds of neem trees. It has been used for centuries to control insects and viruses. Neem oil can be sprayed on plants as a natural remedy to kill aphids.

Get Rid of Aphids With Neem Oil
Image credit: https://finegardentips.com/

The one thing you should keep in mind is that it will also kill beneficial insects such as ladybugs and praying mantis, which may make your aphid problem worse if not used properly. Fill a spray bottle with one gallon of water and add two tablespoons of pure castile soap. Shake until blended.

Then add one tablespoon of neem oil and shake again until blended. Spray on the infested plants every few days, making sure to coat the entire plant, especially the undersides of leaves.

Try Rubbing Alcohol

Aphids are attracted to the color yellow to use this to your advantage. Fill a spray bottle with one cup of rubbing alcohol and add two tablespoons of liquid dish soap. Spray infested plants every few days until the problem is solved. You will need to reapply after rain or watering plants because it washes away easily.

This is a natural remedy for killing aphids in houseplants. Use a cotton swab and dab the rubbing alcohol directly onto the bugs. Before spraying the entire plant, be sure to test the solution on one leaf of the plant first to ensure it won’t damage your plant.

Eliminate Aphid Problem With Cayenne Pepper

If you’re not keen on using harsh chemicals or you want a more organic approach to getting rid of aphids, cayenne pepper may be the solution for you. Cayenne pepper contains a substance called capsaicin which is lethal to aphids.

Grind up one tablespoon of cayenne pepper using a mortar and pestle or a spice grinder to use this method. Then sprinkle the pepper on your plant, ensuring to get it under the leaves. Don’t worry if you don’t have this pepper.

Instead, use a hot and chile hot pepper. All you need to do is add the pepper to the water in a small bowl or spray bottle, then soak the plant’s leaves with the base to keep out your indoor garden intruders for good.

Try Baking Soda and Canola Oil to Battle Plant Pests

Baking soda is a great way to kill any pests that like to suck the juice off your plants. To use, mix two tablespoons of baking soda with one tablespoon of canola oil. Put this mixture into a spray bottle and soak your plant’s leaves for five minutes.

The oil covers the insects and breaks down their exoskeletons, leaving them exposed and more susceptible to toxins. On the other hand, the abrasive nature of baking soda wears down the bug’s outer shell, making it easy to remove from plants.

There are also a number of other home remedies that you can use to get rid of aphids, such as using soapy water or horticultural oils. However, before using any of these methods, test them on a small area of the plant to make sure they are not harmful.

Use Houseplant Sticky Stakes for Flying Aphids

Another way to eliminate aphids is to use sticky stakes. These are small wooden stakes with a sticky material on the top that will trap the aphids when they land. You can buy them from most garden stores or online. Insert the stake into the soil next to the plant, and wait for the aphids to land.

If you see winged aphids on your houseplant, don’t fret. Instead, get some sticky houseplant traps and put a few around nearby houseplants to capture any winged aphid that might be flying around. Sticky traps can also catch fungus gnats, so don’t panic when you see lots of bugs in the trap; they might be fungus gnats.

Many people have found that this is the most effective way to get rid of aphids on houseplants since it is simple and easy to use, plus you can catch a lot of aphids in one setting.

Cut Away Infested Areas

If the infestation is bad, you may find that it’s best to cut away any infested parts of your indoor houseplant. This way, you can kill off the aphids without them spreading. Be careful when cutting so you don’t damage or hurt nearby leaves and branches.

You might want to wear some gardening gloves while doing this. Moving the entire plant may also prove necessary when the whole plant is infested with aphids. Place infected plants in an isolated area such as a balcony or a room away from other plants.

Check for Other Household Pests

It’s also a good idea to check your other household plants for pests like spider mites, whiteflies, and scale insects. These pests can often travel from one plant to another, so it’s important to get rid of them before they take over. Aphids release a sweet, sticky substance known as honeydew, attracting other pests.

This watery substance looks like a little sooty mold on the leaves and is a huge draw for other insects, especially ants. So, it’s important to take care of any aphid infestation as soon as possible to prevent other pests from taking over. Also, learn how to get rid of ants because they can also be a danger to your plants.

FAQs on How to Control Aphids on Indoor Houseplants

How do indoor plants get aphids?

Aphids are easily brought indoors on infested plants. They also come attached to the clothing and through an open window by the wind.

Why do aphids keep coming back?

Aphids are attracted to plants with soft new growth. Thus, overwatering and over-fertilizing your plants may make them more enticing to aphid populations which may cause negative connotations to your plants.

Final Thought on How to Control Aphids on Indoor Houseplants

As you can see, there are numerous natural and commercial products from which to choose in your battle against aphids. Make sure you understand what attracts pests to your indoor garden, and you’ll easily be able to decide how to control aphids on indoor houseplants.

The post How To Control Aphids On Indoor House Plants appeared first on Kitchen Infinity.

Did you miss our previous article…
https://www.thelavkitchen.com/?p=579