Chain link fences are a popular choice for boundary markers because they are inexpensive and easy to install. However, the openness of these fences leaves them exposed to prying eyes. If you’re looking for privacy but don’t want to replace your fence with a solid wood or vinyl panel, there are still ways around it.
Once these fences are installed, they’re hard to remove, even with a tractor because they’re deeply buried and encased in concrete. But there’s no need to live in constant fear of being watched from outside your house if you have a chain-link fence installed in front of it.
Here’s how you can add some privacy without having to spend too much money on expensive fencing materials.
Purchase a Bamboo Fence
You can purchase bamboo fences online or at your local home improvement store. Rolled bamboo fencing is constructed from attached poles ranging in thickness from 3/4 -inch to 2 inches. You can install full bamboo pole screens by attaching the poles to the top and bottom of your chain link fencing. This will not only give you privacy, but it’s also a visually attractive addition to your backyard.
Image credit: https://cdn.shopify.com/
Full bamboo screens are easy to install, and they’re designed for maximum strength and durability. Depending on how much privacy you need, you can use them in front of or behind your pool. If it’s for organic coverings, then full bamboo is durable but for organic material, it will slowly deteriorate unless you keep maintaining it.
Choose the poles cut on the bamboo nodes because they’ll do better than poles with exposed ends. This will extend their life as the nodes act as caps for the poles. While bamboo screens will last for a while, you need to maintain them regularly to get life out of them because various weather elements can deteriorate them. Also, if you’re doing a long fence, then you’ll need multiple bamboo rolls.
Chain Link Fence Slats
Fence slats are the ideal barrier material when you need to fence in an area for privacy purposes. The poles make it possible to see through the screen, but they also prevent anyone from seeing what’s on the other side because of their height. These fences allow for long, narrow pieces to be inserted vertically, so why not do your entire fence with these?
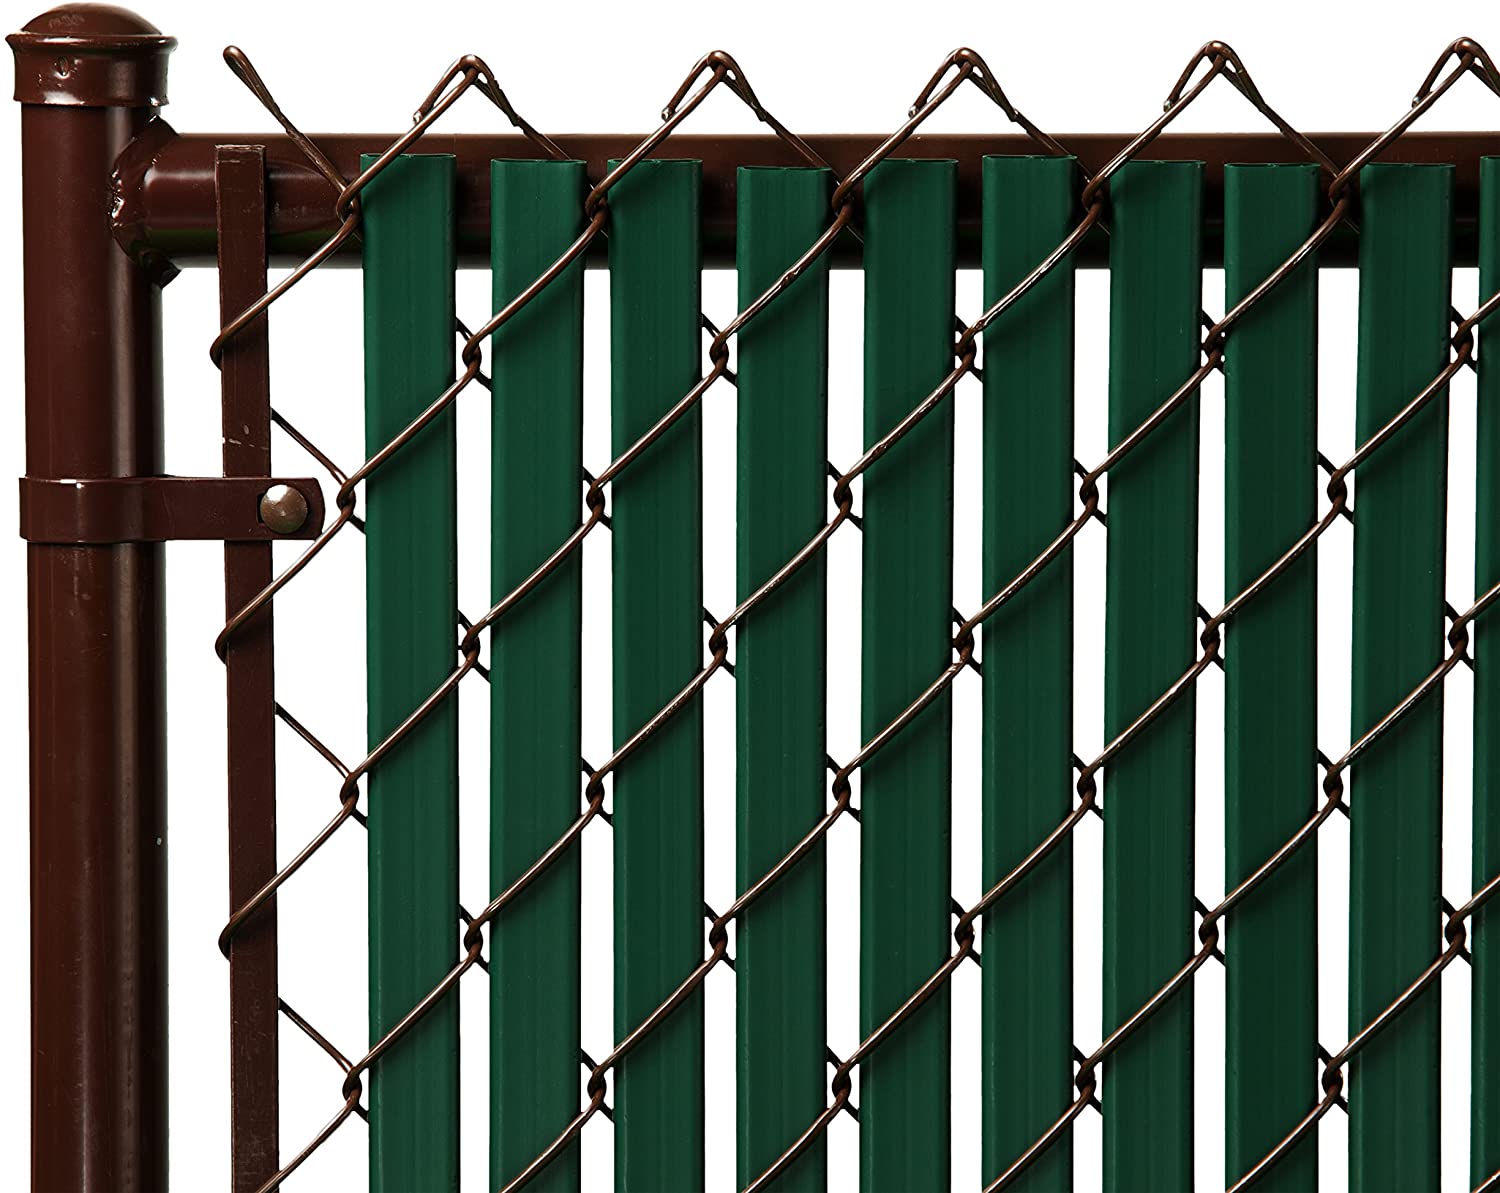
Image credit: https://m.media-amazon.com/
Plus, these privacy screens are economical compared to other types that are made specifically for private areas. Fence slats are made of high-density polyethylene or aluminum. You can also spray paint them with whatever color you like to help match them with the color of your home or complement your home color.
Because of their material, chain link slats can last for a long time. But depending on the weather in your region, you can repaint them once in a while. They’re also easy to replace, so don’t fret if they get damaged.
Reed Screens
This is another option for covering your chain-link fence. Reed screens are thinner than slats, so they may be the best choice if you want something light-weight yet easy to handle. You can install reed screens on top of panels or suspended above them by using L-shaped brackets. This gives you more privacy while still letting fresh air in.
They are about as wide as a drinking straw, making them easy to roll up and transport. If you’re looking for a light-weight fence covering, reed screens are a great choice. On the downside, they are not as sturdy in strong winds because of their thin diameter that can bend under pressure.
They’re very easy to install. You only need to secure them to the chain-link fence using metal wires. They act as a privacy screen, especially if they’re new but will deteriorate and drop as they age.
Wooden Fence Panels
A more permanent solution is to install wooden fence panels. They come in all shapes and colors, but they are commonly used to divide property or act as fencing. You’ll need someone else’s help to hold the panel while you attach it to the chain-link fence.
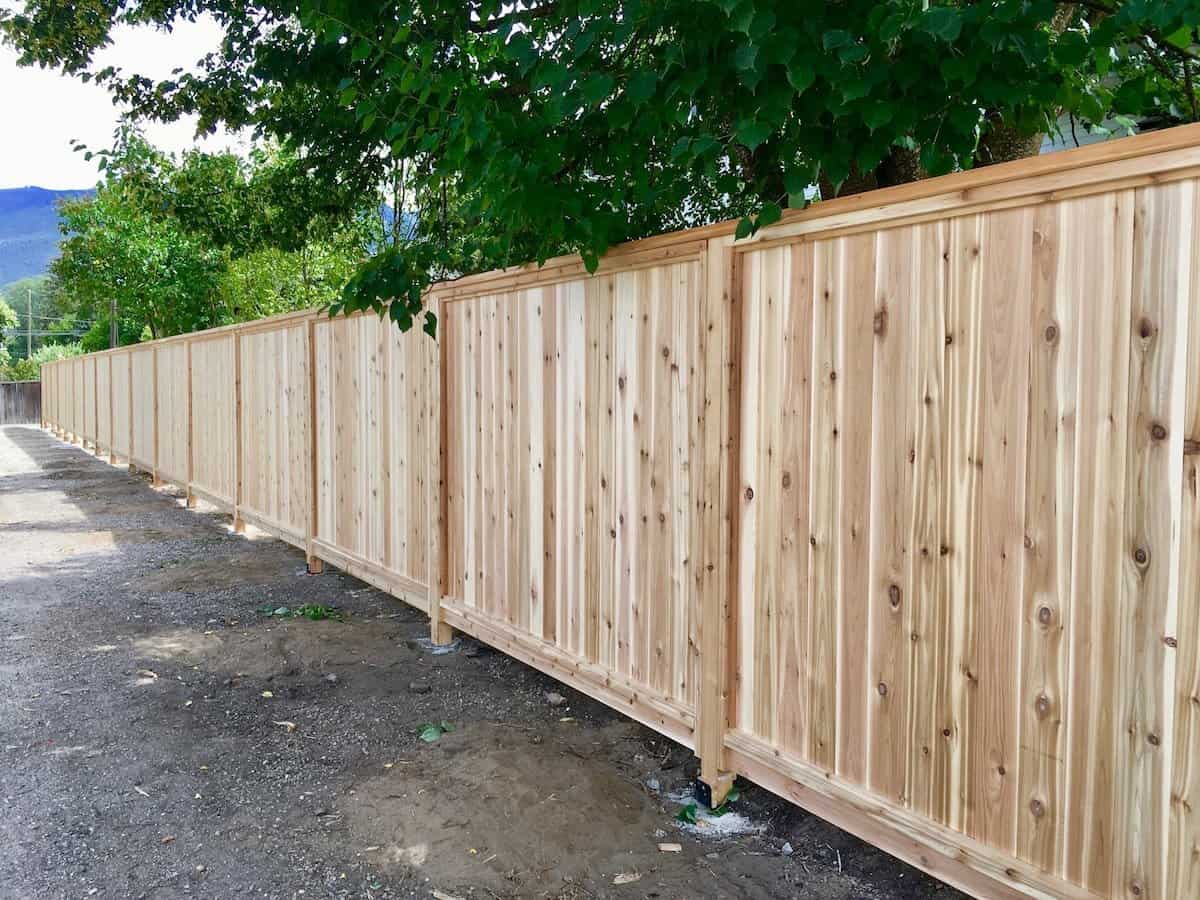
Image credit: https://www.homefortheharvest.com/
It can also be installed with brackets like reed screens, using bolt cutters to cut the fencing wire. They’re the most attractive option when it comes to upgrading your chain-link fence. Using u brackets, screw the wooden fence panels to the main fence line. The brackets are available at any home improvement store.
Since these panels have already been pre-constructed in the factory, there’s no need to individually nail up boards. Wood fence panels are very durable, and if you use cedar, they’ll last nearly as long as the fence they are attached to. You can preserve wood panels by preventing ground contact.
However, you’ll need to obtain a fence permit to attach these panels in front of your chain link fencing. You also need to be handy and inventive to get the best option because there are no hardware kits and systems to help you make conversions.
Mesh Wind Screen
A Mesh wind screen is also called bird netting, which is very effective against pests and has no gaps between the metal mesh that might allow small children to put their heads through. Mesh fencing is already installed into prefabricated panels that you can buy at your local hardware store..
The Mesh privacy screen is water and wind permeable. It also has a double-thick trim around the perimeter, plus brass grommets on the trim to enable you to attach it to the chain-link fence with zip ties. The brass grommets and zip ties make them easier to install and remove than other options.
Mesh screening is highly durable. It’s a non-organic UV rated with high-density polyethylene, enabling it to last for many years. It’s also the lowest cost when compared with other privacy screens.
On the downside, they are more about utility than beauty. They’re often used in industrial areas, schools, tennis courts, and swimming pools, making them unsuitable for home options.
Make Hanging Slats
Choose one cedar plank on top of your privacy panels and lay it horizontally on the ground. After that, lay two smaller cedar boards vertically over the plank. These smaller boards will help support the round lattice panels.
Ensure the side boards are level to prevent the slats from hanging straight on your chain link fence. Space the rest of the cedar boards evenly and nail them in place. The remaining cedar planks will form the rest of the panel. Measure the space between the top and the bottom of the slat the place the remaining cedar planks in between them.
Plant Bushes and Trees in Chain Link Fence
Covering a chain link fence with wood planks is not the only option you have. If privacy and security are what you’re after, then plant bushes and trees in front of your chain link fence. This will help conceal the area and create a more secure feel.
Make sure you pick the tree that is suitable for your growing location. Choose a plant-based on the temperature in your region, plus consider if you need a plant that will survive well in sunlight, dry soil, and keep its color year-round. If you’re going with bushes, trees, or shrubs, they’ll require weekly maintenance and can take a few years to grow to full size. Also, trim the plant evenly along the top and sides and keep the top wider than the base so light filters down to the lower branches.
FAQs on How to Cover a Chain-Link Fence and Give Yourself Privacy
Can you put a privacy screen on your fence?
Yes, you can put a privacy screen on your chain-link fence depending on where you live. The local homeowners association always restricts installing screens into your fence.
How deep do chain link fence posts need to be?
Chain link fence posts must be deep enough in the ground to support your fencing and any additional security features you add on.
Can I use vines for privacy?
Vines are an excellent choice of plant material because they can grow quickly, provide shade, give privacy and save money.
Does a chain link fence increase the resale value of a property?
Yes, having a chain-link fence can increase the resale value up to 4% because it’s practical and stylish at the same time. But not every fence is the same. If you’re looking to increase your resale value, you can opt for the wood-paneled fence.
Final Thought on How to Cover a Chain-Link Fence and Give Yourself Privacy
As you see, there are so many ways you can add privacy into your chain link fence and stop prying eyes and outsiders from peeping through the fence. There are so many different plants you can plant to give yourself privacy. You can screw these in your existing fence and get the impression that your chain link fence has disappeared.
Moreover, planting grass around your fence is a great idea since it will help you achieve that perfect green lawn. It doesn’t matter where you live or for what reason you have installed the chain link fence; there are always ways to improve the look and feel of the fence, make it more private, and do something with all that open space.
The post How to Cover a Chain-Link Fence and Give Yourself Privacy appeared first on Kitchen Infinity.
Did you miss our previous article…
https://www.thelavkitchen.com/?p=254