
Wood floors are beautiful, but they can get damaged easily. This is why you should know how to apply polyurethane to floors correctly. Polyurethane is a very important part of the flooring process because it protects your hardwood from scratches and other damages.
But if you don’t apply it correctly, your efforts will be useless. If you want to learn everything about this topic, keep reading our article.
Follow this step-by-step guide on how to apply polyurethane for floors correctly using the right products and tools. This way, you can be sure that your hardwood flooring will look great with minimal effort on your part.
What You’ll Need
Mineral spiritsWhite vinegarContainer or canNatural bristle brushOil-based polyurethaneWater-based polyurethaneBreathing and synthetic protectionPainter’s tapePaint tray and linersVacuum machineSander machineCutting padMixing stickRoller padGrit sandpaperSteel woolClean clothsPolyurethanePaint brush
Choose the Type of Polyurethane
You can choose water-based polyurethane if your floors are natural color or oil-based polyurethane if your floor has been stained or finished. Water-based polyurethane is the way to go if you’re hoping to complete the project within one day. Oil-based polyurethane tends to be less expensive than water-based, but it takes more prep work and time to complete the job.
Water-based polyurethane looks milky and dries to a clear finish, while oil-based adds a deeper hue to the existing color of the floor. Oil-based also has a strong odor and takes longer to dry.
Make Sure You Have a Well-Ventilated Working Area
One of the most important steps to follow when applying polyurethane is to have a well-ventilated working area. If you plan on applying several coats, it’s best to use a room with a large open window and a fan. Put on proper protective equipment before applying polyurethane.
Make sure your windows are open and use window fans to circulate fresh air throughout the room. Open your doors to allow the smell of polyurethane to escape
Prepare the Floor by Sanding
Lightly sand down rough surface on your wood floor. Sanding down your hardwood flooring is very important because it gives the new coat of polyurethane a nice smooth surface that will allow the finish to adhere. Sweep and mop your floors before sanding; you don’t want sawdust in between coats.
Image caption: https://www.thespruce.com/
If possible, try not to use a hose or power washer to clean your floor as it can damage wood grain and cause water damage to a floor. You might not even know it is damaged. Allow the wood flooring to dry before continuing. Start sanding while considering the condition of your floor.
Rent a sanding machine and use the machine’s user manual to guide you. If your floors are severely damaged, and you want to change the color completely, sand down the wood to bare wood.
On the other hand, you can screen and recoat with polyurethane without sanding down the flooring, but make sure you remove any glue or residue left on the floors. Wipe down your room with a tack cloth to pick up sawdust. Allow your hardwood to dry completely while sanding.
Vacuum Your Floor
The sanding process can kick up a lot of sawdust, so start this step by using a shop vacuum cleaner to carefully suck up the debris. Use a vacuum machine to clean all the dust and unwanted particles from the floor. Carefully clean all corners so that small objects like hair and cotton balls don’t cause a problem later.
Cleaning is very important as it will leave you with a beautiful topcoat. So, after vacuuming, use white vinegar and water to wipe down your floor. Remember to turn on the fan to let the room dry quickly. This will enable your wooden floor to become stronger and more flexible.
Make sure you clean all the edges and corners properly, as this is a major part of the wooden floor. Make sure you use a white vinegar and water solution and also a mop. Don’t forget to wear your gloves while using this product.
Once it’s clean, use a dry cloth to wipe down all remnants of cleaners on your floor. You can then use a hairdryer to make sure there’s no moisture left on the floor. If you’re applying water-based polyurethane, make sure you stain your wooden flooring before applying the polyurethane.
Wipe Down the Surface by Mineral Spirits
After vacuuming, use mineral spirits or paint thinner to wipe down the surface. Apply it with a lint-free cloth, let this dry completely and make sure there are no streaks left behind on your flooring. This will remove all the remaining debris and dust.
Make sure you wipe the entire floor as you pay much attention to cracks and crevices to remove all oil and dust particles. After wiping, allow it to dry fully before coating it with polyurethane. You can find mineral spirits in the paint-and-primer section of home improvement stores, hardware stores, and superstores in your area.
Protect Your Baseboards with Masking Tape
If you have wooden baseboards in your home, make sure to protect them from the overspray of polyurethane when painting your floor with masking tape. This tape will help keep any polyurethane from getting on the baseboards when projecting it onto the floor’s surface. To stick the tape to the wall, just run a wet rag along the surface.
Mix Your Polyurethane
Mixing your polyurethane will help you achieve a durable coating. You can use a big jar or can to get your polyurethane liquid in one container. Pouring all your liquid in one container will help them mix better than in separate containers.
Use a stirrer or paint stick to remove all lumps of polyurethane before application. A stick will help you get all the layers, so there aren’t any shades of color on your floor. Keep stirring until your entire mixture is even and smooth. Your container should also be large enough to be able to mix it without spilling or making a mess.
After all, you wouldn’t want to run out of liquid before applying the liquid in your entire room. When you’re done mixing, shake your can of polyurethane, then pour it on a paint tray.
pplying the Polyurethane
Apply the first coat using a paint brush or painter’s pad. You can also use a bristle brush but not lambswool applicator or foam pads. These tools leave it hard to remove streaks, so be sure to use a good brush when applying polyurethane. Don’t make your layers too thick; they should be about 1/16 of an inch or less.
Use a bristle brush to coat all the corners and edges of your floor. You can use a very thin, light coat on these areas to ensure that they dry correctly and don’t form water bubbles. After that, use an applicator pad or roller pad to brush your polyurethane onto the rest of your floor. This should be a medium to heavy coat, but again, not too thick.
When applying polyurethane with an applicator pad, go in small sections, covering about four to six square feet at a time. You can use one hand for rolling and another for turning the pad over. This process has the potential to become very messy, so you should have something to wipe your hands off as you go.
pply the Second and Third coat
Let the floor dry overnight, then fill in any missed spots with a second coat of polyurethane the next day. Water-based polyurethane products are not as thick as oil-based polyurethane products, and they take less time to dry than oil-based polyurethane.
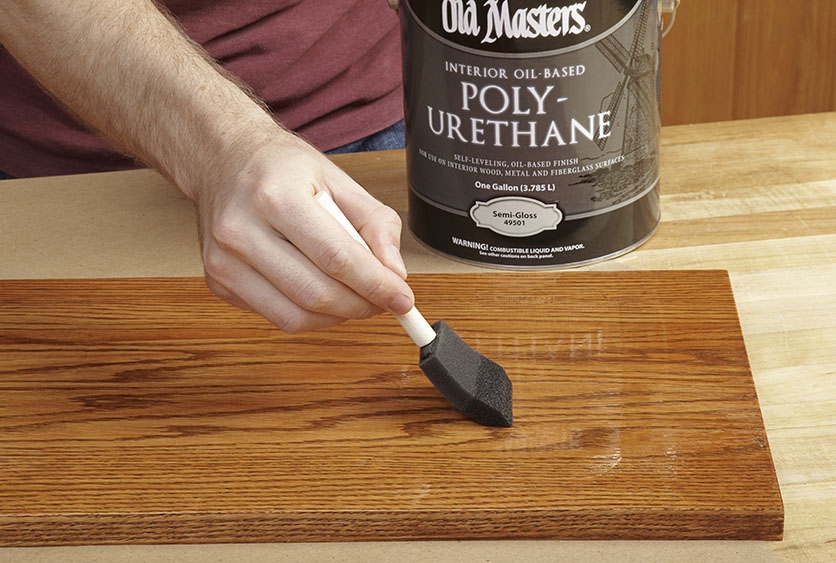
Image caption: https://static.woodmagazine.com/
So, give it 3-4 hours to dry before applying the next coat. If you want to use an oil-based product, you’ll need to wait one week between coats. After your first coat is fully dried, softly sand the entire floor with 220-grit sandpaper for a smooth finish.
Before applying the second coat, use liquid white vinegar to wipe down the floor. It’s also important to clean your wooden floors before you apply the second coat. Follow the same steps as with your first coat to apply the second coat.
The last thing you want to do is put on too much polyurethane, which will leave oily patches that will be impossible to clean up without damaging your flooring. So apply it sparingly and take your time. One good coat should do the trick for most floors, but you may need to go over certain problem areas twice to achieve a consistent finish.
Let your wood floor sit for three to four hours before sanding and cleaning the surface. Paint the final coat, the third coat, and leave your floor dry for three to four hours to get the prolific finish.
Use Abrasive Pad to Even Out the Surface
To create an even finish and to help with the drying process, it is advisable to rub the polyurethane with a piece of coarse sandpaper or steel wool. This will give you a smoother surface and ensure that your finished product has an attractive sheen.
Recoat the Finish and Let it Dry for 24 Hours
Avoid walking on your floor for 24 hours after applying the final coat. Wait until the polyurethane dries before walking in. Don’t replace your furniture for at least three days, and wait for one week before replacing your rugs and carpets. This will make your floor fully cure.
/GettyImages-183771871-dd1b7eb9d6d74b61a7c57dcb61e280fc.jpg)
Image caption: https://www.thesprucecrafts.com/
Clean the Floor
Clean up any spills immediately with a damp cloth to prevent stains from setting into the finish. Always use an approved cleaner on your floor, as well as a mop or dry rag to clean it. Avoid using water if possible, as this will create marks and streaks.
FAQS on How to Apply Polyurethane for Floors
What is the best applicator for polyurethane on floors?
Polyurethane is applied with a brush, paint roller, or spraying. Brush application gives an even finish and is recommended for small areas of less than 150 square feet. Rollers are easier to handle on smooth surfaces, while spraying requires more skill but can get into hard-to-reach corners.
How often do I need to apply polyurethane?
Recoating your floor with polyurethane depends on many factors: traffic and use, frequency of cleaning, and how long you wait between coats. Most floors need refinishing every year or two. The first coat should be applied as soon as the old finish has dried thoroughly.
Final Thought on How to Apply Polyurethane for Floors
Polyurethane coating is an extremely useful liquid to improve the durability of your surface. A perfectly wooden floor also makes a home a comfortable place to live in. Make sure you follow the steps mentioned above correctly because using incorrect steps can waste time and money.
Follow this guide on applying polyurethane on hardwood floors to complete your flooring project in the right manner. It is always better to use all available resources before starting with any home improvement activity.
The post How to Apply Polyurethane for Floors appeared first on Kitchen Infinity.
Did you miss our previous article…
https://www.thelavkitchen.com/?p=378