Kitchen Remodeling – Do it Yourself Or Hire a Contractor 

remodel

Considering Kitchen Remodeling project? Consider doing it yourself. You can save a lot of money by doing it yourself. You can also do it in stages, focusing on updates you really need. For example, you can update your cabinets, paint them, add appliances, and add new lighting. You can choose to replace your appliances with higher-quality ones as they will increase their visual appeal and ROI. Regardless of the extent of your remodel, you’ll be glad you did it!

remodel

A general contractor, on the other hand, will oversee the work of subcontractors. The result will be a lot of dust and noise, which could last for weeks or months. You can cut costs by hiring your own subcontractors or by doing some of the work yourself. You’ll need to decide which approach will work best for you, as mistakes and mishaps will cost you money. Luckily, there are many tips that can help you save money and time on your kitchen remodel.

The kitchen layout varies depending on the current layout, your future goals, and your budget. A kitchen with a good layout may just need an update, while a kitchen with an awkward layout may need a complete redesign. Keep in mind your budget, how much it will increase the value of your home, and find a solution that meets your functional and aesthetic needs. And don’t forget to have fun! Once you’ve done this, you’ll have a new kitchen that you’ll love every time you spend in it.

After you’ve chosen the design and style of your kitchen, you’ll need to decide on the materials and hardware. A DIY job can be time-consuming and result in foundation problems. You’ll need to make decisions quickly, but you can also make decisions at the last minute. Remember, a Kitchen Remodeling project can be a great experience if you’re patient and knowledgeable about the process. The process can be expensive, but the rewards are worth it.

If you’re a DIY-er, you can save money by buying peel-and-stick tile for just a few dollars per square foot. Painting cabinets is popular again, and you can make a chic pop of color on your own. An average Kitchen Remodeling project will take from six to eight weeks, although six to eight weeks is a reasonable time frame for most contractors. You can choose the type of remodeling that fits your lifestyle and budget.

Another great idea for your kitchen remodels is to consider the accessibility needs of people with disabilities. If you have small children, consider a ground-floor kitchen with accessible ovens, drawers, and shelves. For your convenience and safety, set up zones for different activities, such as cooking and dining. Ensure the zones do not overlap. For example, the fridge should be at the outer corner of the cooking zone so that it can be easily reached without going near the stove.

For the walls, neutral colors are ideal. They maintain the overall look of a kitchen. If you like to change things frequently, you might consider wallpaper rather than paint. This is because changing wallpaper is easier than repainting the kitchen. You can also save money by sticking to the original layout and design. You might even be surprised by how much money you’ll save if you stick to your original layout. But make sure to incorporate a few creative touches into your new kitchen!

While a Kitchen Remodeling project will cost a fair amount, it will pay off in the long run. With a well-done remodel, you’ll have a new kitchen that will be the focal point of your family’s life. Plus, your new kitchen will be the focal point of family gatherings and social events. Whether you’re planning to sell your home or keep it as a rental, it’s definitely worth the investment. There are many benefits of doing a Kitchen Remodeling project, and you’ll want to get the job done right.

You can choose countertops made of recycled glass or wood or replace your old ones with eco-friendly ones. A green kitchen will also be eco-friendly and save you money. Consider purchasing sustainable materials like marble and bamboo, and you’ll be amazed at the difference they make. It’s never too late to start thinking green. The more you know, the more you’ll appreciate the results!


FAQs About Granite Countertops

FAQs About Granite Countertops

If you’re looking for a beautiful, long-lasting countertop for your kitchen, consider Granite Countertops. Not only do these countertops provide a natural look, but they can also add significant value to your home. However, they are not cheap, so it’s important to consider your budget before making a decision. This article will cover the most common questions about granite countertops. Getting the right look is key, and granite countertops are not cheap, but they are worth the money.
granite countertopsThe best way to keep your granite countertops looking their best is to maintain them properly. A sealer is essential in preserving granite countertops. These materials are porous, so liquids and chemicals will eventually evaporate, or be absorbed by the stone. To speed up this process, use different poultices. This will help to prevent water and dirt from damaging the stone. If you’re unsure how to maintain your granite countertops, ask your fabricator for a recommendation.
There is a low level of radiation that most granite countertops emit, but the emissions are insignificant compared to the background radiation originating from outer space and the earth’s crust. Despite this, radiation inspectors and concerned homeowners have contacted the Environmental Protection Agency, reporting elevated levels of radon in granite countertops. The results of their tests showed that the radon level in the kitchen countertop was 1.3 millirem per hour. Ultimately, the low-level emissions of granite countertops do pose a health risk, but they don’t necessarily mean that you can’t enjoy them.
Although quartz and granite countertops are similar in appearance, their qualities differ widely. Your decision will ultimately depend on your budget, personal preferences, and the type of project. Quartz slabs have made their way into the market, and home improvement stores are aggressively marketing these materials. Granite, on the other hand, is a natural stone. The process of mining begins by pulling out massive blocks of rock, which are then cut into slabs. These slabs are then polished to bring out their natural beauty.
The downside to granite countertops is the price. They are incredibly expensive, and you’ll need to have them sealed every year to minimize the growth of bacteria. Because they’re so expensive, it’s important to hire a professional to install them. In addition, granite countertops are difficult to repair, so you might need to hire a professional. So, before you decide to install your new granite countertop, remember to learn about its pros and cons.
Granite countertops have beautiful natural veins and are easy to clean, but they do require annual or periodic sealing to maintain their luster and color. The best way to protect your countertops is to avoid using highly acidic or alkaline cleaning products. In addition to avoiding acids, you can also consider applying stain protectants. While you might not need to seal your granite countertops, you can apply them to engineered quartz and other materials as well. A simple solution is to use a neutral pH cleaning solution, water, and a non-abrasive cloth.
A beveled edge is a more contemporary option for granite countertops. It creates a sleek, modern appearance. These edges are also easy to clean and don’t hold spills. A waterfall edge is also an excellent choice for contemporary designs. In general, beveled edges are the least expensive and easiest to clean. If you’re not sure what kind of edge to choose, consider the design of your kitchen before choosing a particular countertop.
Because granite is a natural stone, the price of a slab will vary. The cost per square foot will depend on the thickness of the slab and how many granite slabs you purchase. Common granite color is white and green. A distinctive color like red or blue may cost up to $200 per square foot. However, this will depend on your kitchen’s size and layout. Granite countertops are extremely durable and will last for decades. So you can’t go wrong with this beautiful countertop option.
If you want to keep your granite countertops looking beautiful, you should clean them regularly with a soft cloth. Avoid using over-the-counter polishes, because these can leave a residue that will collect dirt and stains over time. Moreover, avoid using acidic or abrasive cleaners on your granite countertops. As long as you use a non-abrasive cloth, you should be good to go. Remember, granite can withstand high temperatures, but extreme temperatures can damage the material.

How to Make Money Filling Out Surveys Online

Online Survey

If you’ve been wondering how to make money filling out surveys online, this guide is for you! It will explain how to sign up for survey invitations and earn money. The more surveys you fill out, the more money you’ll make! Just remember to follow these guidelines, and you’ll be well on your way to earning cash online. Check Is Inbox Dollars A Scam for some helpful tips to get you started.

Online SurveyParticipate in surveys that reward you with a gift card, a cash payment, or free products. Some companies pay in gift cards or cash and will even enter you into sweepstakes. You can earn gift cards or cash by completing surveys, and you’ll never have to worry about running out! Just pick a survey provider and enter your details to get started.

Spend as little time as possible completing surveys. While you can earn a few dollars here and there, you shouldn’t rely on survey earnings as your sole source of income. Ultimately, you’ll want to enjoy your online survey experience. So, make sure to set aside some time every day for it. Remember, if you want to earn a decent amount of money, you should be consistent and dedicated. Most online surveys question the performance of products and services. Your honest feedback will help these companies improve.

The survey length will vary from site to site, but it’s worth keeping in mind that most surveys take from five to fifteen minutes. Many sites will tell you how long to expect the survey to last. Many sites also give you the option to track your progress. In general, most surveys take between five and 15 minutes. It’s best to do a longer survey if you can spare some time, but short surveys can still yield substantial earnings.

Signing up for multiple survey sites is important to maximize your earnings from online surveys. You never know which surveys will be worth more. Signing up with a good site does not guarantee to get surveys, so you’ll want to register with multiple survey sites. And, as with any other endeavor, time is money, so don’t waste it! It would be best if you considered these tips as you sign up for online surveys.

While you’re unlikely to find instant riches from taking paid online surveys, you can earn extra spending money or discounts. And you can establish a regular cash flow. Paid surveys are not for everyone. However, if you enjoy taking online surveys, you’ll be rewarded for your time. There are a number of online survey sites that don’t pay well. So, beware of spammy sites and websites that bombard people with emails or ask intrusive questions.

The most popular site to join is Branded Surveys. It has more than 2 million registered members and has paid out over $17 million since it opened. The only disadvantage to this site is that some of its surveys take you off-platform. To sign up, you must be 16 years of age and a resident of the United States. Then, you’ll be set! But, before you start, remember that cashing out your earnings is the only way to ensure that you have enough to live on.

The best-paid surveys are the ones that reward you for answering a questionnaire. The best survey sites pay you with gift cards, prepaid Visa credit cards, and PayPal deposits. These are not full-time jobs. But if you can find the time to work with these survey sites, you’ll make a decent income. So, what are you waiting for? Start earning money online now! You can even earn hundreds of dollars per year!

It’s important to choose the best survey sites, though. Not every survey site is worth your time, so you should try multiple sites before choosing one. If you want to earn the most from online surveys:

  1. Focus on those with a high payout to time requirement ratio.
  2. In other words, make sure you get the most money per hour.
  3. In addition, take the time to compare the ROI of each survey.

There are many ways to make money from home online, and answering surveys is one of them. Many people spend a lot of time on the Internet, and filling out surveys online is an easy and convenient way to make extra cash. But it is important to manage your time efficiently to get the most out of your work. Listed below are some time-saving tips to maximize your profits and save time while filling out surveys.


How to Save Money on a Kitchen Remodelling Project

How to Save Money on a Kitchen Remodelling Project

When you decide to redo your kitchen, you’ll have many options. Among those options are adding new appliances and fixtures, changing the layout, and improving the functionality of the space. The good news is that there are plenty of ways to save money on your kitchen remodeling project. Once you’ve determined your budget, you can get to work planning your kitchen remodeling project. Read on for some tips you can follow.

kitchen remodelling
First, turn off the water before you start. Make sure you have a plan for getting rid of debris. Depending on what type of countertop you plan to install, you may need to hire a contractor. Once the cabinets have been installed, you can take measurements for your new countertop. Countertop fabrication can take a few weeks or even a month. After the cabinets have been installed, you’ll have to schedule a final inspection during business hours.
Getting a professional to do the work for you can be costly. Most people hire contractors, design-build firms, or a combination of all three. But it’s possible to do the majority of the work yourself if you know what you’re doing. Then you can plan your daily activities around the new kitchen. But keep in mind that hiring a professional can take weeks or even months. Make sure you have the time and the skill set to complete the remodeling project.
A kitchen remodeling project may require a wide range of services. From removing an exterior wall to extending space into a yard, a kitchen remodeling project involves many elements of a house renovation. In addition to cabinetry, a kitchen renovation project can involve painting and flooring, replastering, and electrical and lighting upgrades. If you’re planning to sell your property, remodeling can make it more appealing to buyers.
When remodeling your kitchen, you’ll need to apply for permits. Different agencies administer permits. You can check with your city or county government or with the water company to make sure you have everything in order. Your general contractor will apply for these permits on your behalf. Make sure to hire someone who’s qualified and experienced to make your remodeling a seamless process. When hiring a contractor, always ask for references and check their credentials. You’ll be happier with the result.
Getting a kitchen makeover done is a great way to upgrade your space, but beware of overspending. New appliances and space-saving accessories can quickly add up to a significant amount of money. That’s why it’s so important to set a budget before you start the renovation process. Be sure to include essentials and leave some extra money for value-adds. And remember to make sure you get a great deal on your renovation!
Plumbing and wiring are not skills you can learn overnight. Your kitchen is likely to require new plumbing and several new circuits. These can be complicated and dangerous, so you’re probably best off subcontracting these tasks to the pros. If you are a do-it-yourselfer, you can do some of the construction yourself, but if you’re not comfortable with working around heavy equipment, it’s better to hire someone who knows what they’re doing.
When you’re planning your kitchen remodeling project, you can visit showrooms and home shops to get a feel for what you want. Take a look at your neighbor’s kitchen to get an idea of what they have. Remember to always opt for high-quality materials that are easy to care for and last for a long time. This way, you’ll have the best quality materials in your kitchen for years to come. The same goes for your kitchen furniture, appliances, and countertops.
After figuring out which features you want to add, you can then begin shopping for a contractor. After narrowing down your list of requirements, you can compare price quotes and save the best ideas. Remember, a better design will lead to a more accurate budget. Make sure to look at a wide range of designs and consider how you will use your kitchen. You can also sketch out the basic floor plan to help contractors estimate their costs.
The cost of a kitchen remodeling depends on several factors, including the size of the project, where you live, the materials used, and your budget. Hiring a contractor will save you money on the materials. However, you will have to manage the workflow. The good news is that you’ll be saving money on the entire project. It will also allow you to do some of the work yourself, like demolition and installing cabinets.

How to Complete Drywall Repair

drywall

There are several steps you must follow to complete Drywall Repair Las Vegas NV. First, you need to remove any dust that has been sanded around the hole. This will make the patching process more difficult and add an unwanted texture to the wall. Also, the sanded dust is often difficult to remove, which will make it impossible to cover the entire repair. Following these steps is essential for ensuring that the patch will not be visible after it is completed.

drywall

First, cut out the corner bead that has been damaged. The bead is the metal strip that protects the two drywall sheets on the outside corner of the wall. The corner bead is concealed by two or three layers of joint compound. The metal corner bead is incredibly tough, but it can still be damaged. The damage usually only affects a small section of the corner bead. To prevent drywall from falling, you should replace this corner bead.
The next step in repairing drywall involves replacing the damaged drywall with new drywall. First, you will need to cut a new section of drywall large enough to cover the damaged area. You can either cut the new section around the existing hole or insert it into the damaged drywall. Then, apply joint compound and a fresh coat of paint to the drywall. This step is often the most difficult part of the drywall repair process.
If the hole is small, you can usually patch it yourself. However, it would help if you took the time to mark out any utilities in the wall before starting. It would be best if you cut out the damaged drywall first. Afterward, it would be best to place wood laths, which should be three inches longer than the hole. Ensure to align the laths with the top and bottom of the hole and screw them into the wall with a one-quarter inch drywall screw. Then, you can insert a section of undamaged drywall and screw the wood laths to it.
Popped nails and screws are other common problems for drywall repair. You may need to apply drywall spackling compounds to the affected area. Before applying drywall spackling compound, wear safety goggles and catch any drywall dust on a drop cloth. After the drywall spackling compound has completely dried, you can apply a coat of touch-up paint to the repaired area. Using a putty knife to remove nail pops is easy, but you should always wear protective gear and safety goggles when performing this task.
The most important step in repairing drywall is to measure the area where you need to repair it carefully. A good rule of thumb is to cut a square patch that is slightly larger than the hole. It should be wider, taller, and thinner than the hole itself. Next, cut the paper backing away on all sides. Then, hold the new piece over the damaged drywall and trace the edges of the repaired drywall. Once the joint compound is dry, the repaired piece should be smooth and have no noticeable gaps.
You should always check that there are no pipes or electrical cords near the hole. This way, you can avoid cutting any deeper than necessary. It is also best to wear protective goggles and gloves while patching a hole in drywall. If you are unfamiliar with repairing drywall, it is better to hire a professional. So, get started on your drywall repair project and make your home beautiful. Take advantage of the tips mentioned here and enjoy your new drywall space!
Before you choose a drywall contractor, check the credentials of the company. Make sure that they are licensed, bonded, and insured. Check whether they have been in business for at least five years. Ask for an estimate. Do not go for the lowest price – you need to be sure that the contractor is reputable. You can also check if they offer a free estimate. However, make sure that you choose a contractor who offers you a written contract.
The first step in repairing drywall is assessing the damage. A skilled drywall repair professional can determine which materials and tools you will need. Doing so can save you money and help you get back on your feet quickly. If you do not want to spend money on a professional, you can perform the work yourself with the right materials and tools. You can also perform a DIY repair project by patching the damaged drywall yourself. Once you have done this, you can paint it or apply mud.

Kitchen Remodeling

remodel

remodelDepending on your budget, you have two options: a small or an extensive Kitchen Remodeling Shreveport LA. The little remodel will preserve the existing footprint but improve the look and functionality of the space. Major changes include new flooring, cabinets, lighting, fixtures, and appliances. Many people choose energy-efficient appliances. Cabinetry is the most costly part of kitchen remodeling. You can save money by purchasing ready-to-assemble cabinets or refacing your existing cabinets.

Turn off your water and electricity before you begin any kitchen work. Plan for debris cleanup. Plan for debris removal and making sure that fixtures and pipes are not damaged in the remodeling process. You must also be able remove any rough-in work (plumbing and framing) that may be within the walls.

Keep in mind that the kitchen is the heart of your home. Remodeling your kitchen can help increase its value. Although your kitchen renovation will not cost you as much, it will add value to your house. You won’t regret hiring a kitchen remodeling company that is qualified. You can save money on remodeling by getting a loan that suits your needs.

Although hiring a contractor to remodel your kitchen is expensive, it may be possible to save money by doing it yourself. You should be aware that contractors will charge a percentage to complete the project. This can be done yourself or by hiring subcontractors. You should know that making mistakes can result in huge financial losses. You can save money and still have a modern kitchen.

You need to be clear about what you want and need before you begin the kitchen remodel process. Consider whether the investment you made in your kitchen renovation will be worthwhile and whether it will result in a sale of your home. For a large project such as a layout extension, it is worth hiring a professional. However, this can be expensive and may mean that you will have to wait for months before the work is completed. This will ensure that your kitchen remodel goes smoothly and you can enjoy the final results.

A kitchen that is outdated will not be attractive to buyers if you are looking to sell your house. A modern kitchen can be a great asset to your home, and will help you sell it faster. You can have the kitchen of your dreams by hiring a professional contractor for home remodeling. Kitchen remodels are a great way for you to control the layout of your appliances as well as your counter space. Remodeling a kitchen has the greatest advantage: it allows for flexibility.

Depending on how extensive the work is, a major kitchen remodel can take anywhere from four to eight weeks. A small remodel can be completed in a matter of days. However, larger renovations can take up to three months. Refacing existing cabinets can be a cost-effective and easy way to transform your kitchen. The results will be great and you’ll feel great. If you are patient and have enough time, this project can be very rewarding.

A kitchen renovation does not alter the original structure, but it can change the layout and other features. A kitchen remodel can make a cramped space into an open-concept, spacious kitchen. The process can increase lighting and make the space easier to use for cooking. A renovation may be cheaper depending on the extent of your project and your budget. A kitchen remodel can include an island, which will make it easier to cook and more efficient.

Consider the items you use every day when designing your kitchen. Breakfast foods, for example, should be kept near the breakfast table. Plaster containers should be kept close to the work area. Dishware and flatware should all be placed near the dishwasher. It will make it easier for them to locate them when they are needed. Your cabinets should be arranged according to how you use them. Take into account the swing direction of cabinets doors and appliances.

How to Begin Kitchen Remodeling

How to Begin Kitchen Remodeling

When planning to remodel your kitchen, you have many options. If you’re reselling your home, you can recoup most of the costs of your renovation, but you must pay for it now. If you’re remodeling just one room, you can aim to spend no more than 15 percent of the house’s total value. It’s a good idea to cut 20 percent off your budget and save it for unexpected expenses. You can use existing space and empty cupboards to save even more money.

kitchen

Before beginning your Kitchen Remodeling project, it is important to decide whether to hire a general contractor or do it yourself. Although you can do some of the work yourself, some parts of the process will require a professional. For example, if you’re putting in new appliances, you’ll need to clear a temporary cooking area while the construction crews work. In addition, you’ll need to make sure that you have enough space for kids and pets during the renovations.
Using a general contractor will allow you to choose a better kitchen design. A general contractor can also help you determine what kind of flooring to install, including cabinets. Subcontractors can be a good choice if you have the budget to pay them, but they can also make your kitchen a noisy place. During the construction process, you may need to set up a temporary cooking space to supervise the workers. You can use the area as a workspace, so make sure your kids and pets have a safe place to play.
After the contractor finishes the construction, you should decide where to place appliances. Having a temporary kitchen area will allow you to continue your daily activities while building the new kitchen. In addition, you should also plan a new area for your cooking space. Finally, if you have small children or pets, make sure you have designated a separate area for them to be in. This will ensure that your new space will be a safe place for them while the renovation process continues.
Once you’ve decided on the design and layout of your new kitchen, you should find a licensed contractor to complete the work. Getting several estimates from different contractors will ensure you get the best deal possible. Depending on your budget, you might need to choose a general contractor that offers a lower price and can do the job on time. After you’ve chosen a general contractor, you should plan the time for the actual remodeling.
After you’ve finalized the design, the next step is to choose appliances. When you’ve decided on the style and color of your kitchen, you can now choose the location of your appliances. This will allow you to choose the best designs for your new kitchen. While you’ll have to work with your general contractor, you should know how to do the work yourself. You’ll have to be careful with wires and other electrical outlets because you don’t want to break any of them.
Once you’ve determined the design, it’s time to choose the right appliances. When remodeling your kitchen, you’ll need to make sure to choose appliances that match your personality. In addition to choosing the right ones, you should also consider the type of appliances that will best fit your new kitchen. This way, you’ll be able to prepare for the upcoming tasks. It’s also essential to make sure that the materials you’re using are safe for children and pets.
The first step in kitchen remodeling is to remove outdated materials. You can do this yourself if you’re handy with demolition. However, it’s best to hire a licensed contractor if you’re not comfortable doing it yourself. The process of remodeling your kitchen is not only rewarding but can also be dangerous. It can also damage your home. Listed below are some common tips to keep in mind when you’re planning to remodel your kitchen.
Before you start your kitchen remodeling project, make sure you’re well-equipped with the necessary skills to do so safely. Most kitchen remodeling projects require significant construction tasks, which can be difficult for homeowners. If you’re not a professional, you’ll need to hire a professional to do this work. For example, you should be able to handle structural construction yourself, but if you’re a beginner, it’s best to hire someone who can handle those jobs.

Cabinet Refinishing Services

Cabinet Refinishing Services

A cabinet is a case that holds shelves and drawers. Some are free-standing, and others are attached to or built into walls. These cases are typically wood, synthetic materials, or coated steel. Read on to learn more about the process of Cabinetry Austin TX. Here are some helpful tips. Let’s get started!

cabinet

Choosing the Right Cabinets for Your House is Important! While you may not think of cabinets as essential to your home, they are essential for their overall design. The right cabinets for your home will add value to your home and improve the functionality of your space. In addition, unlike other renovations, cabinetry will not take months to complete, and you won’t have to worry about re-decorating for several months. After all, it’s a one-time investment and will add more value to your home.
While cabinetry plays an important role in the design of your home, it’s important to consider the different types of cabinets and how they affect the design of your house. While cabinets play a prominent role in the kitchen and bathroom, they are also crucial to other rooms of your house. There are various types of materials for cabinets, and their durability and aesthetic appeal will influence the overall design of your home. In addition to its practicality, the right choice of cabinetry will increase the value of your home.
Choosing the Right Cabinets is Important for Your Home! Having a well-designed and functional kitchen can be a great way to increase the value of your home. The right cabinets can make a difference in your space’s overall design and function. A well-designed kitchen can increase your property’s value by as much as 50%. And with the right type of cabinets, you can even save money! It is essential to choose the right materials when it comes to cabinetry.
There are many options available for your home. Plywood and particleboard are both durable and cheap, and you can choose from a variety of finishes for your kitchen. If you’re looking to update your kitchen, cabinets are a great way to make your house more appealing and functional. First, however, you’ll need to decide which type of cabinetry will fit in your space. Then, once you’ve decided on the right material, you’ll have to decide what style will best suit your home.
Choosing the Right Cabinetry is a vital part of your home design. A kitchen is the heart of the home, and it is the most important room of the house. Depending on how much space it has, it can be a small, cozy, or spacious and open space. It would be best if you also considered how much you’d use the cabinets in each room. A cabinet will determine the style and function of a kitchen.
The next step is choosing the right material for your cabinets. The best materials are durable and affordable. A few basic materials, such as wood, are ideal for a kitchen. Most people choose to paint their cabinets in different colors. Some people prefer a traditional color while others prefer to paint their cabinets with modern color. If you’re not a fan of the traditional look, there are several other choices. Finally, there are cabinets that are designed to be durable and attractive.
Choosing the Right Cabinetry is an important factor in your house’s design. They play an essential role in the kitchen and are essential for the bathroom. The materials used to make cabinets will affect the durability and overall design of the entire home. If you’re planning to install veneered cabinets in your kitchen, you should be able to install new doors and drawers on your own. These aren’t difficult to install, but you’ll need to be a skilled carpenter if you want to do the job yourself.
The materials you choose will affect the overall design of your kitchen. Maple is a beautiful hardwood that is largely white with occasional reddish-brown tones. The wood’s natural coloring is warm and inviting. Its beauty makes it a popular choice for kitchens. If you don’t like the wood in your cabinets, you can choose veneers or MDF. Both of these materials will add a new touch to your kitchen.

How To Sweep A Floor

How To Sweep A Floor

When it comes to home cleaning projects, sweeping floors is very important. Sweeping keeps your floors free from unsightly and unhygienic dust and debris. Sweeping a floor is an essential home task that many people do wrong.

Many people don’t realize that the way you sweep can make all the difference in keeping your floor clean. If you want to keep your home looking its best between mops or vacuums, consider these helpful hints when trying to effectively sweep a floor of any kind. Here’s how to sweep a floor.

Clear Away Obstructions and Messes

Start by decluttering a room you intend to sweep to remove any messy obstructions. Additionally, remove furniture, throw rugs, and many decorations that may get in your way while sweeping.

This is also a good opportunity to throw your rugs in the wash and dust any furniture. Doing this will prevent your throw rugs and furniture from getting your freshly cleaned floors dirty when you replace them.

Choose the Best Broom for Your Needs

There are a variety of brooms on the market these days, so it’s important to choose the right one for your specific needs. If you’re sweeping a hard floor, such as tile or linoleum, you’ll need a stiff broom that can effectively move dirt and debris. For smoother floors, opt for synthetic brooms.


Image credit: https://www.homestratosphere.com/

For rough texture floors, use natural fiber bristles. After deciding on the type of bristle you need, find a broom with angled bristles to get into corners and crevices. Lastly, pick a broom with a comfortable height handle that is not too heavy.

Also, don’t forget a dustpan and a hand broom. A hand broom will help you sweep your debris pile into the dustbin. Use a dustpan with a razor thin lip to help you sweep up all the dust.

Pick a Sweeping Method

When it comes to sweeping, there are several ways you can go about it. You may start sweeping on the outer edges of a room by pushing and building a dirt pile at the center of the broom.

Pick a Sweeping Method
Image credit: https://www.thespruce.com/

You can also start at one end of the room and keep the dirt pile close as you move about the floor or you can sweep a section at a time and put dirt piles in the trash can after completing each section. Make sure you choose a method and starting point that works best for you.

Start Sweeping in the Furthest Room

If you’re sweeping a floor for the first time, start in the furthest room from the entrance and work your way towards the front door. This will help keep all the dirt and dust in one area and make it easier to clean up.

Begin on a section of the floor that’s away from your body and gently drag the broom toward your body. You can use quick short motions or long sweeping motions to get the job done. Make sure you choose a sweeping style that fits your personal preference.

Clean Your Broom Periodically

It’s always best to take care of your tools, so make sure you clean your broom frequently. Dirt and dust will build upon the broom bristles over time so it’s important to remove buildup before it becomes a problem. You can wash or wipe off any loose dirt with water or use a brush to get at the harder-to-reach areas.

This is very important because as you sweep, your broom may accumulate dander, pet hair, and dust bunnies on the bristles. Turn your broom upside down and use your hand to remove the lint, pet hair, and other woozies from the bristles. If you’re still far from the collection point, take that fistful of fuzzy and dump it directly in your garbage can.

Dispose of the Dirt Pile

Now it’s time to get rid of that dirt pile. If you have a dustpan, this will be a breeze. Simply place the dust pan directly under the dirt pile, and using your other hand, flick the pile into the pan. If you don’t have a dustpan, no worries – just use your broom to push the pile over to a garbage can.

Wash Your Supplies and Put them Away

After sweeping your floors, the broom bristles will get dirty, especially if you have pet dander and human hair on your floor. Most of the time, your broom just needs a quick removal of build-up with your hand. As you clean your broom, don’t forget your brush and the dustpan.

Wash Your Supplies and Put them Away
Image credit: https://empire-s3-production.bobvila.com/

Use dish soap to wash things, and place them away in their rightful places. Don’t leave your broom standing up against the wall – this will cause it to lose its shape, weakening the bristles. Always store the broom with bristles upright and off the floor.

Use the Drawbridge Technique to Deal with Annoying Dustpan Lines

If you want to get crazy, you can use the drawbridge technique to deal with annoying dustpan lines. This is a two-person process that will make cleaning the floor much faster. One person sweeps the dirt and debris towards the dustpan while the other person uses their free hand to keep the pan open so nothing falls out. The person with the dustpan has to act like a drawbridge, keeping their hand on top of it while making sure nothing falls out.

This method is very important, especially if the dustpan you’re using has a lip that’s too thick to let dust and smaller pieces of debris pass over easily. You can also vacuum or wipe up dust lines that you’re having difficulty corralling with your broom.

FAQs about How to Sweep a Floor

Is it better to sweep or vacuum the floor?

Sweeping is a great way of cleaning floors of large debris. However, for hardwood floors, it’s better to vacuum to get rid of fine dust and particles that may miss, especially in the wood floor crevices.

What is the proper way of holding a broom?

When holding a broom, you should grip it about one-third of the way down from the top. This will give you the best balance and control when sweeping. Make sure you use both two hands to hold the broom.

Can I sweep up liquid spills?

No, sweeping liquid spills will only spread them around and make the mess bigger. Instead, use a mop or towel to soak up the liquid. Learn how to mop a floor to make cleaning spills easier.

How do you sweep without stirring up dust?

Use smaller, shorter strokes while holding the broom more parallel to the floor. This will help you avoid stirring up dust while sweeping.

Final Thought about how to Sweep a Floor

As you can see, sweeping the floor is not that difficult, but also not as easy as you thought. And by following these simple steps, your floor will be far cleaner than it would have been had you simply dragged the old broom across it.

The post How To Sweep A Floor appeared first on Kitchen Infinity.

When to Put Out Hummingbird Feeders

When to Put Out Hummingbird Feeders

The best time to put out hummingbird feeders has always been a challenge for new birders. Many people start feeding birds before they are ready, which can be harmful to the birds. While taking care of the baby birds is very important, you should not endanger them in the process. You should wait until some flowers begin blooming in spring, and then you can start putting out your feeder.

Also, it’s very important that you keep your nectar solution clean or change it frequently because this will help keep your birds healthy from diseases. We’ve created this guide with all of the information you need about when to put out hummingbird feeders so that you don’t make any mistakes when welcoming these beautiful little creatures into your yard. Let’s get started!

Factors Affecting When the Hummingbird Season Starts

Location

If you live in an area with a longer spring and summer season, you won’t need to put out your hummingbird feeder till later. However, if you live in an area where the winters are colder and snowier, or spring comes earlier than other places, you can put out your feeders as soon as the air starts to warm up a bit.

For example, some southern and coastal states of the United States and Mexico, plus the Caribbean and South America, are home to hungry birds year-round. While in other regions, the best time to put out hummingbird feeders depends on the local hummingbird population and migratory patterns of specific species.

Climate and Temperature

Mild climates and warmer areas are attractive to hummingbirds in early spring. Therefore, it’s best to start feeding hummingbirds earlier in those areas. But in areas with cooler temperatures and later springs, only bring out the feeders when it starts to warm up.

Migration Patterns

Hummingbirds are migratory birds. Therefore, when their food sources start to decline in one region or area, they tend to move on to explore for more abundant food. Because of the varying migration patterns of different species, you must know when your local hummingbirds tend to migrate away from your location. If you wait too long to put out feeders, you might miss the birds at their time of year.

Feeding Hummingbirds

Feeding hummingbird’s sugar water is a surefire way of attracting hummingbirds into your yard. Make sure you keep the sugar to water ratio at 1 to 4 to mimic natural flower nectar. Also, keep the hummingbird feeder clean to avoid introducing diseases to your hummingbirds. To attract hummingbirds to your feeder, mix a solution of four parts water and one part table sugar.


Image credit: https://www.thespruce.com/

Hummingbirds not only feed on nectar, which you provide for feeders, they also eat flying insects and spiders. This means that if you stop feeding hummingbirds for any reason, the hummingbirds will just survive. Do not use honey or alternative sugars when filling feeders.

A great example of a beautiful hummingbird includes the Ruby model hummingbird. This bird has five feeding ports in 10 ounces, so it empties in 3 to 5 days with only one or two birds. It’s also easy to clean and doesn’t leak. It comes with a built-in ant moat and has larger volumes if you have more individual hummingbirds visiting your yard.

When to Feed Hummingbirds

The best time to offer sugar water for hummingbirds is when nearby native flowers are shedding. Hummingbirds appreciate having extra hummingbird food during the spring migration. Most hummingbirds migrate to southern climes in winter. They return very early in the spring. They may encounter snow or freezing temperatures when nights are still cold.

When to Feed Hummingbirds
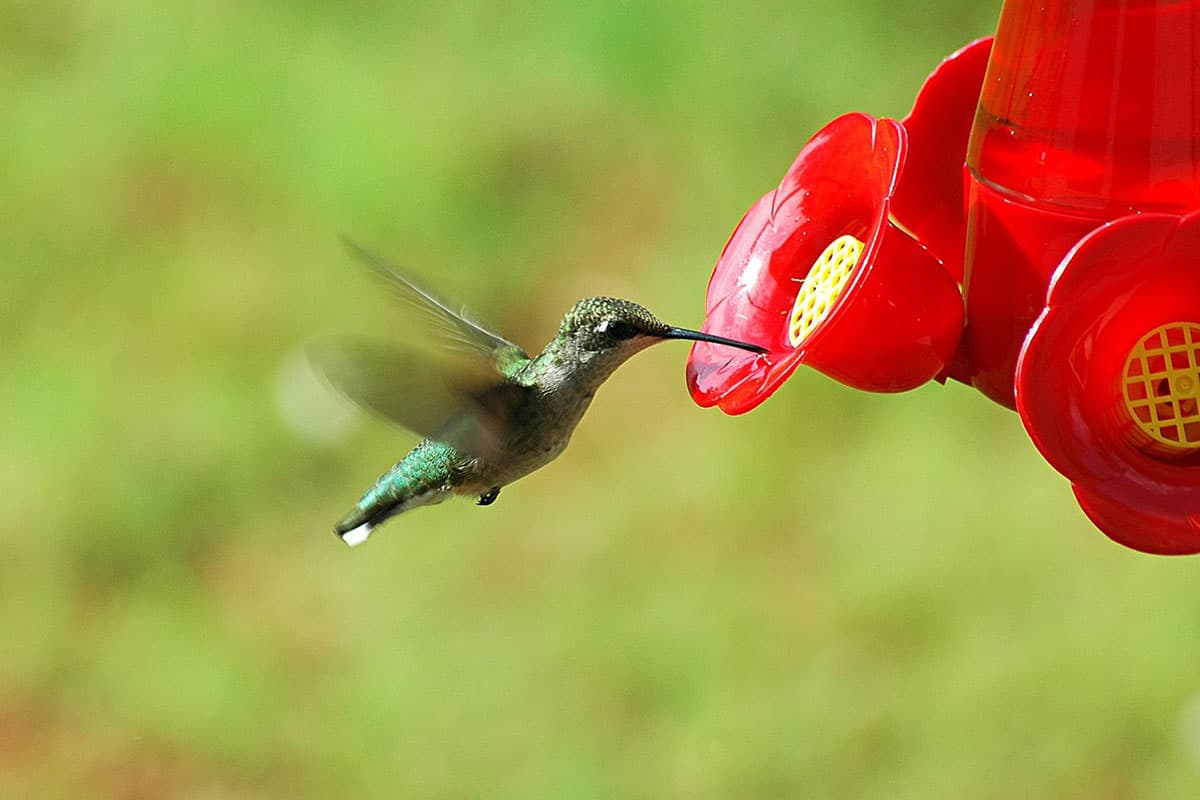
Image credit: https://birdfeederhub.com/

Your feeder provides needed energy to keep them going until they reach their final destination. Therefore, having your hummingbird feeders set up and out of the earliest migrants can help them in the spring. These birds also don’t migrate at the same time. The weather they also encounter on their travels may also aid or hamper their travels.

Generally, males migrate and arrive on their breeding grounds a week or two before the females. Males then set up and defend territories around food sources, flowers, and even your hummingbird feeders.

Hummingbird Season Calendar

The dates of hummingbird feeders can vary, but these birds tend to be reliable in their migration patterns and when they start visiting feeders.

Hummingbird Season Calendar
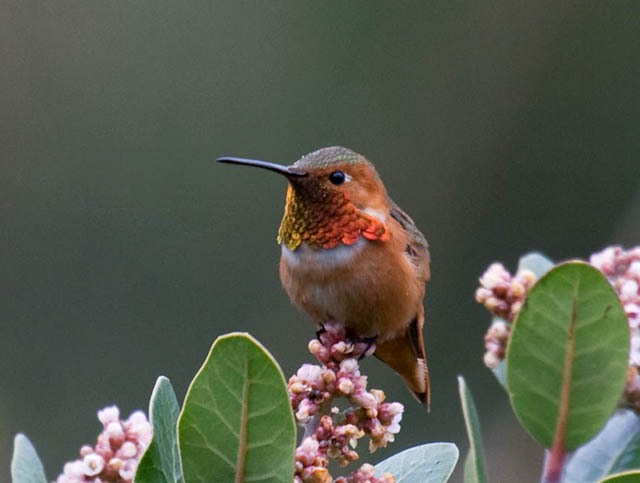
Image credit: https://1.bp.blogspot.com/

Year-Round Feeding

Offer hummingbird feeders all year long in areas where these birds are non-migratory, and overwintering hummingbirds join residents during the winter months. If you’re a birder who’s living along the Pacific coast of the United States and Southern British Columbia, you can feed hummers all year round.

Other states include the Rio Grande Valley of South Texas and along the south Texas Coast, South and Central Florida, and Southeastern Arizona. In the Caribbean, Central America, where many hummingbirds do not migrate, is also ideal.

Several species of hummingbirds found in these places include Rivoli’s hummingbirds, Anna’s hummingbirds, Blue-throated mountain gems and Lucifer hummingbirds. Other species include Calliope hummingbirds, Broad-billed hummingbirds, Violet-crowned, and Buff bellied hummingbirds.

February and March

February and March are great months to put out your feeders in most of the United States. In the spring and summer, hummingbirds will be looking for food to build up their energy reserves for their fall migration. Hummingbirds typically migrate south in the fall, but some may stay in your backyard if you have a reliable food source.

Hummingbird migration begins early in the southern United States. Here, areas like Deep South, including north Florida and south Georgia, can put out hummingbird feeders as soon as the middle to late February or early March and expect to see these tiny birds eating up all of the food. Birds expected include Ruby throated hummingbirds, Rufous hummingbirds, and Black chinned hummingbirds.

March and April

Early migrating hummingbirds that are heading to breeding grounds further north begin appearing in the Central United States as soon as mid to late March and early April. Some people also put their feeders out in late May as hummingbirds migrate through these areas. The Ruby throated Hummingbird and Rufous-throated hummingbirds are common migrants seen in the Central part of the US. They’ll start appearing as soon as mid to late March and early April.

pril and May

April and May are usually the sweet spots for putting up your hummingbird feeders. Around this time is when you’ll see the majority of hummers coming to eat from your feeders out in the wild. Some of these species include Anna’s hummingbird, Costa’s, Allen’s, Rufous, or Anna’s hummingbirds. Hummingbirds begin to reach their northern ranges in late April or early May.

May and June

The months of May and June are when you’ll begin to see a lot of different types of hummingbirds. These birds include Rufous, Allen’s, Black-chinned, and Anna’s hummingbird. In the furthest northern reaches of hummingbird ranges, the birds do not arrive until late spring or early summer.

In the Central Canadian of Calliope hummingbird or the Alaskan territory of the rufous hummingbird, you can wait until mid-May or very early June to put out hummingbird feeders. You should always look for earlier arrivals if you live in these states.

FAQs on When to Put Out Hummingbird Feeders

What time of the day do hummingbirds feed?

The best time when hummingbirds visit your feeder and feed on your nectar is usually dawn to dusk or early in the morning, or late in the afternoon before sunset.

How often will hummingbirds visit a feeder?

On average, you can see a hummingbird in your yard every 5-10 days. If you don’t feed them, they will find other food like flowers and natural nectar in flowers. Thus they will need less food to eat in your yard.

Final Thought on When to Put Out Hummingbird Feeders

It’s always a great idea to put hummingbird feeders earlier rather than later. This is because when the hummingbirds are in your yard, it’s almost guaranteed that they will return even before you know it, and they won’t return if there’s no food for them. So, you should improve your gardening skills by knowing how to take care of these birds.

The post When to Put Out Hummingbird Feeders appeared first on Kitchen Infinity.

Did you miss our previous article…
https://www.thelavkitchen.com/?p=888